Overview
Codeducator is a desktop address book application for private programming language tutors.
Users are able to track the progress of their students, manage their tutoring schedule and other important information about their students.
Codeducator has a graphical user interface built with JavaFX but most of the user interactions are done using command line interface. It is written in Java and has about 10 kLoC.
This project is based on the AddressBook-Level4 created by the SE-EDU initiative.
Summary of contributions
-
Major enhancement: added a dashboard feature
-
What it does:
-
The dashboard aims to help tutors track the progress of each of their student.
-
Each student will have a dashboard.
-
Tutors are able to add milestones they want their students to achieve to their dashboards. Each milestone signifies a significant accomplishment in the development of the student’s learning progress.
-
Tutors are able to add a list of tasks to each milestone. A task is a piece of work that needs to be done to be closer to achieving the milestone.
-
Tutors are able to mark each task as completed, which updates the progress of the milestone.
-
Tutors are able to delete milestone and delete task.
-
-
Justification: Besides managing their student contacts, tutors will also need to manage the learning progress of their students so that they can tutor them better. If they have a large number of students they tutor, it is hard to keep track of what needs to be done for each of them. Hence, this feature not only allows tutors to manage both their student contacts and student progress all in one place, it also provides them ease in documenting and tracking their students' learning development.
-
-
Minor enhancement: added a favourites feature
-
What it does: Allows users to add students to favourites and view the list of students in favourites.
-
Justification: Tutors may have some students that they wish to take note of. This feature helps tutors highlight these students and access them easily.
-
-
Code contributed: [Functional code] [Test code]
-
Other contributions:
-
Project management:
-
Managed release
v1.4on GitHub
-
-
Documentation:
-
Did cosmetic tweaks to existing contents of the Developer Guide: #167
-
-
Community:
-
Others:
-
Refactored the name of some classes in the context of Codeducator (changed the name of
PersontoStudentandSubjecttoProgrammingLanguage): #27
-
-
Contributions to the User Guide
Given below are sections I contributed to the User Guide. They showcase my ability to write documentation targeting end-users. |
Dashboard
In Codeducator, you can track the learning progress of your students easily by utilising our Dashboard feature.
Each of your student in your contact list has their own dashboard which you can view and manage easily.
What’s in a dashboard?
-
Milestones:
Each dashboard will have a list of milestones. A milestone signifies a major step in the learning progress of your student. Codeducator allows you to create and add milestones in your students' dashboards so that you can keep track of learning objectives you have set for them. -
Tasks:
Each milestone can contain a list of tasks. A task signifies a piece of work to be done to meet the milestone’s objective. Codeducator allows you to create and add tasks to each milestone so that you can keep track of what has already been done and what still needs to be done to reach the milestone.
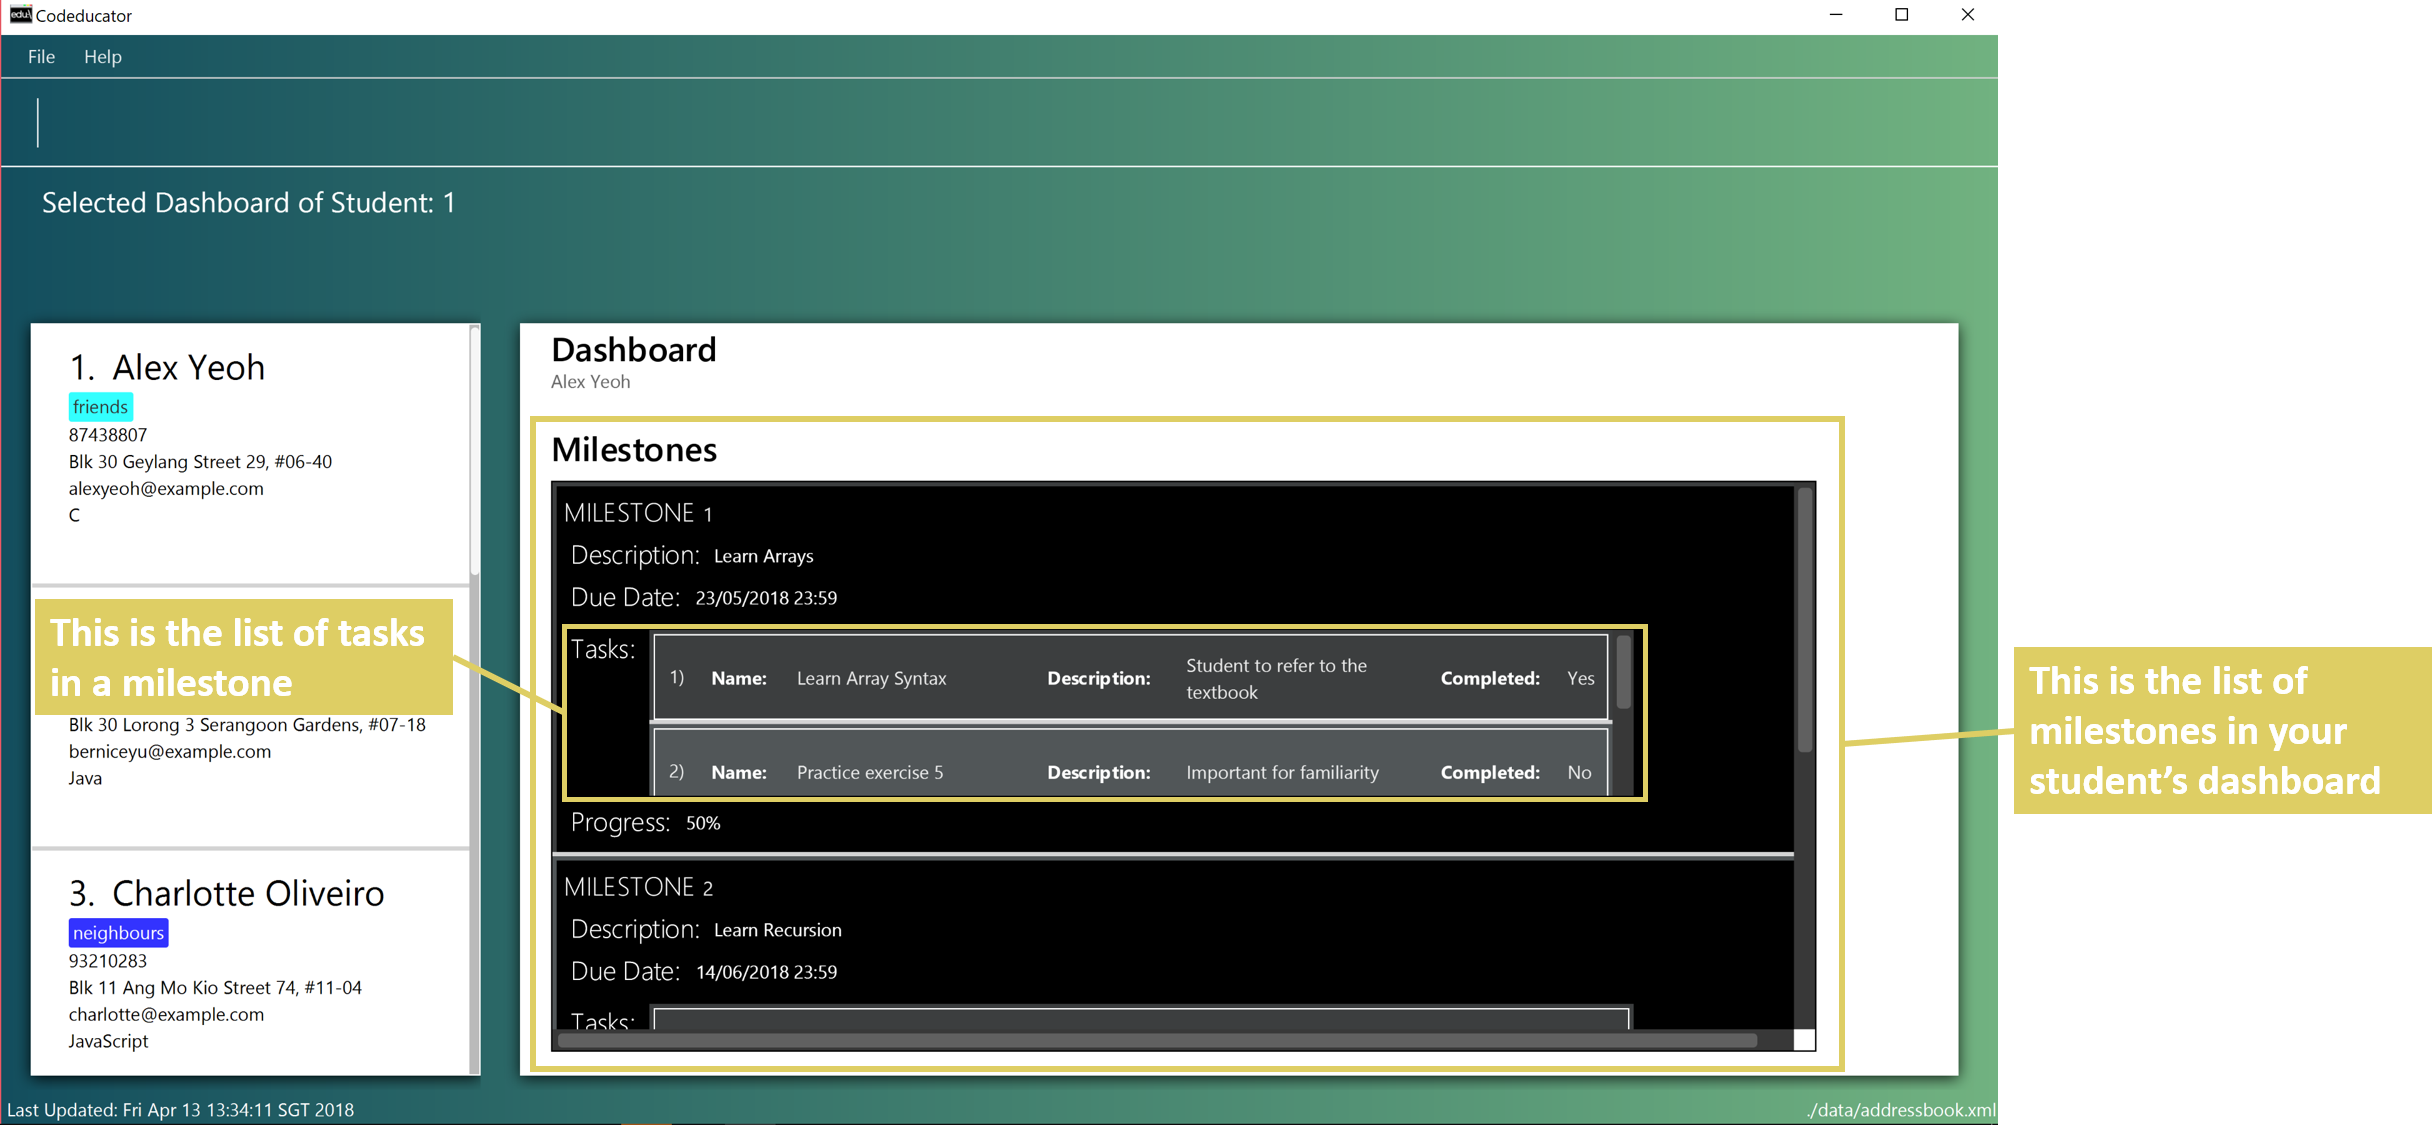
Showing the dashboard of a student: showDB
You can view the dashboard of a student by using the showDB command.
Format: showDB STUDENT_INDEX
Example:
-
list
showDB 1
Shows the dashboard of the 1st student in the address book.
Steps taken to show the dashboard of a student
Step 1: First, find the student whose dashboard you wish to view using the list command (see [Listing all students : list]).
Step 2: Once you have found the student, type showDB into the command box, followed by the STUDENT_INDEX of the student in the list. Press Enter to execute it.
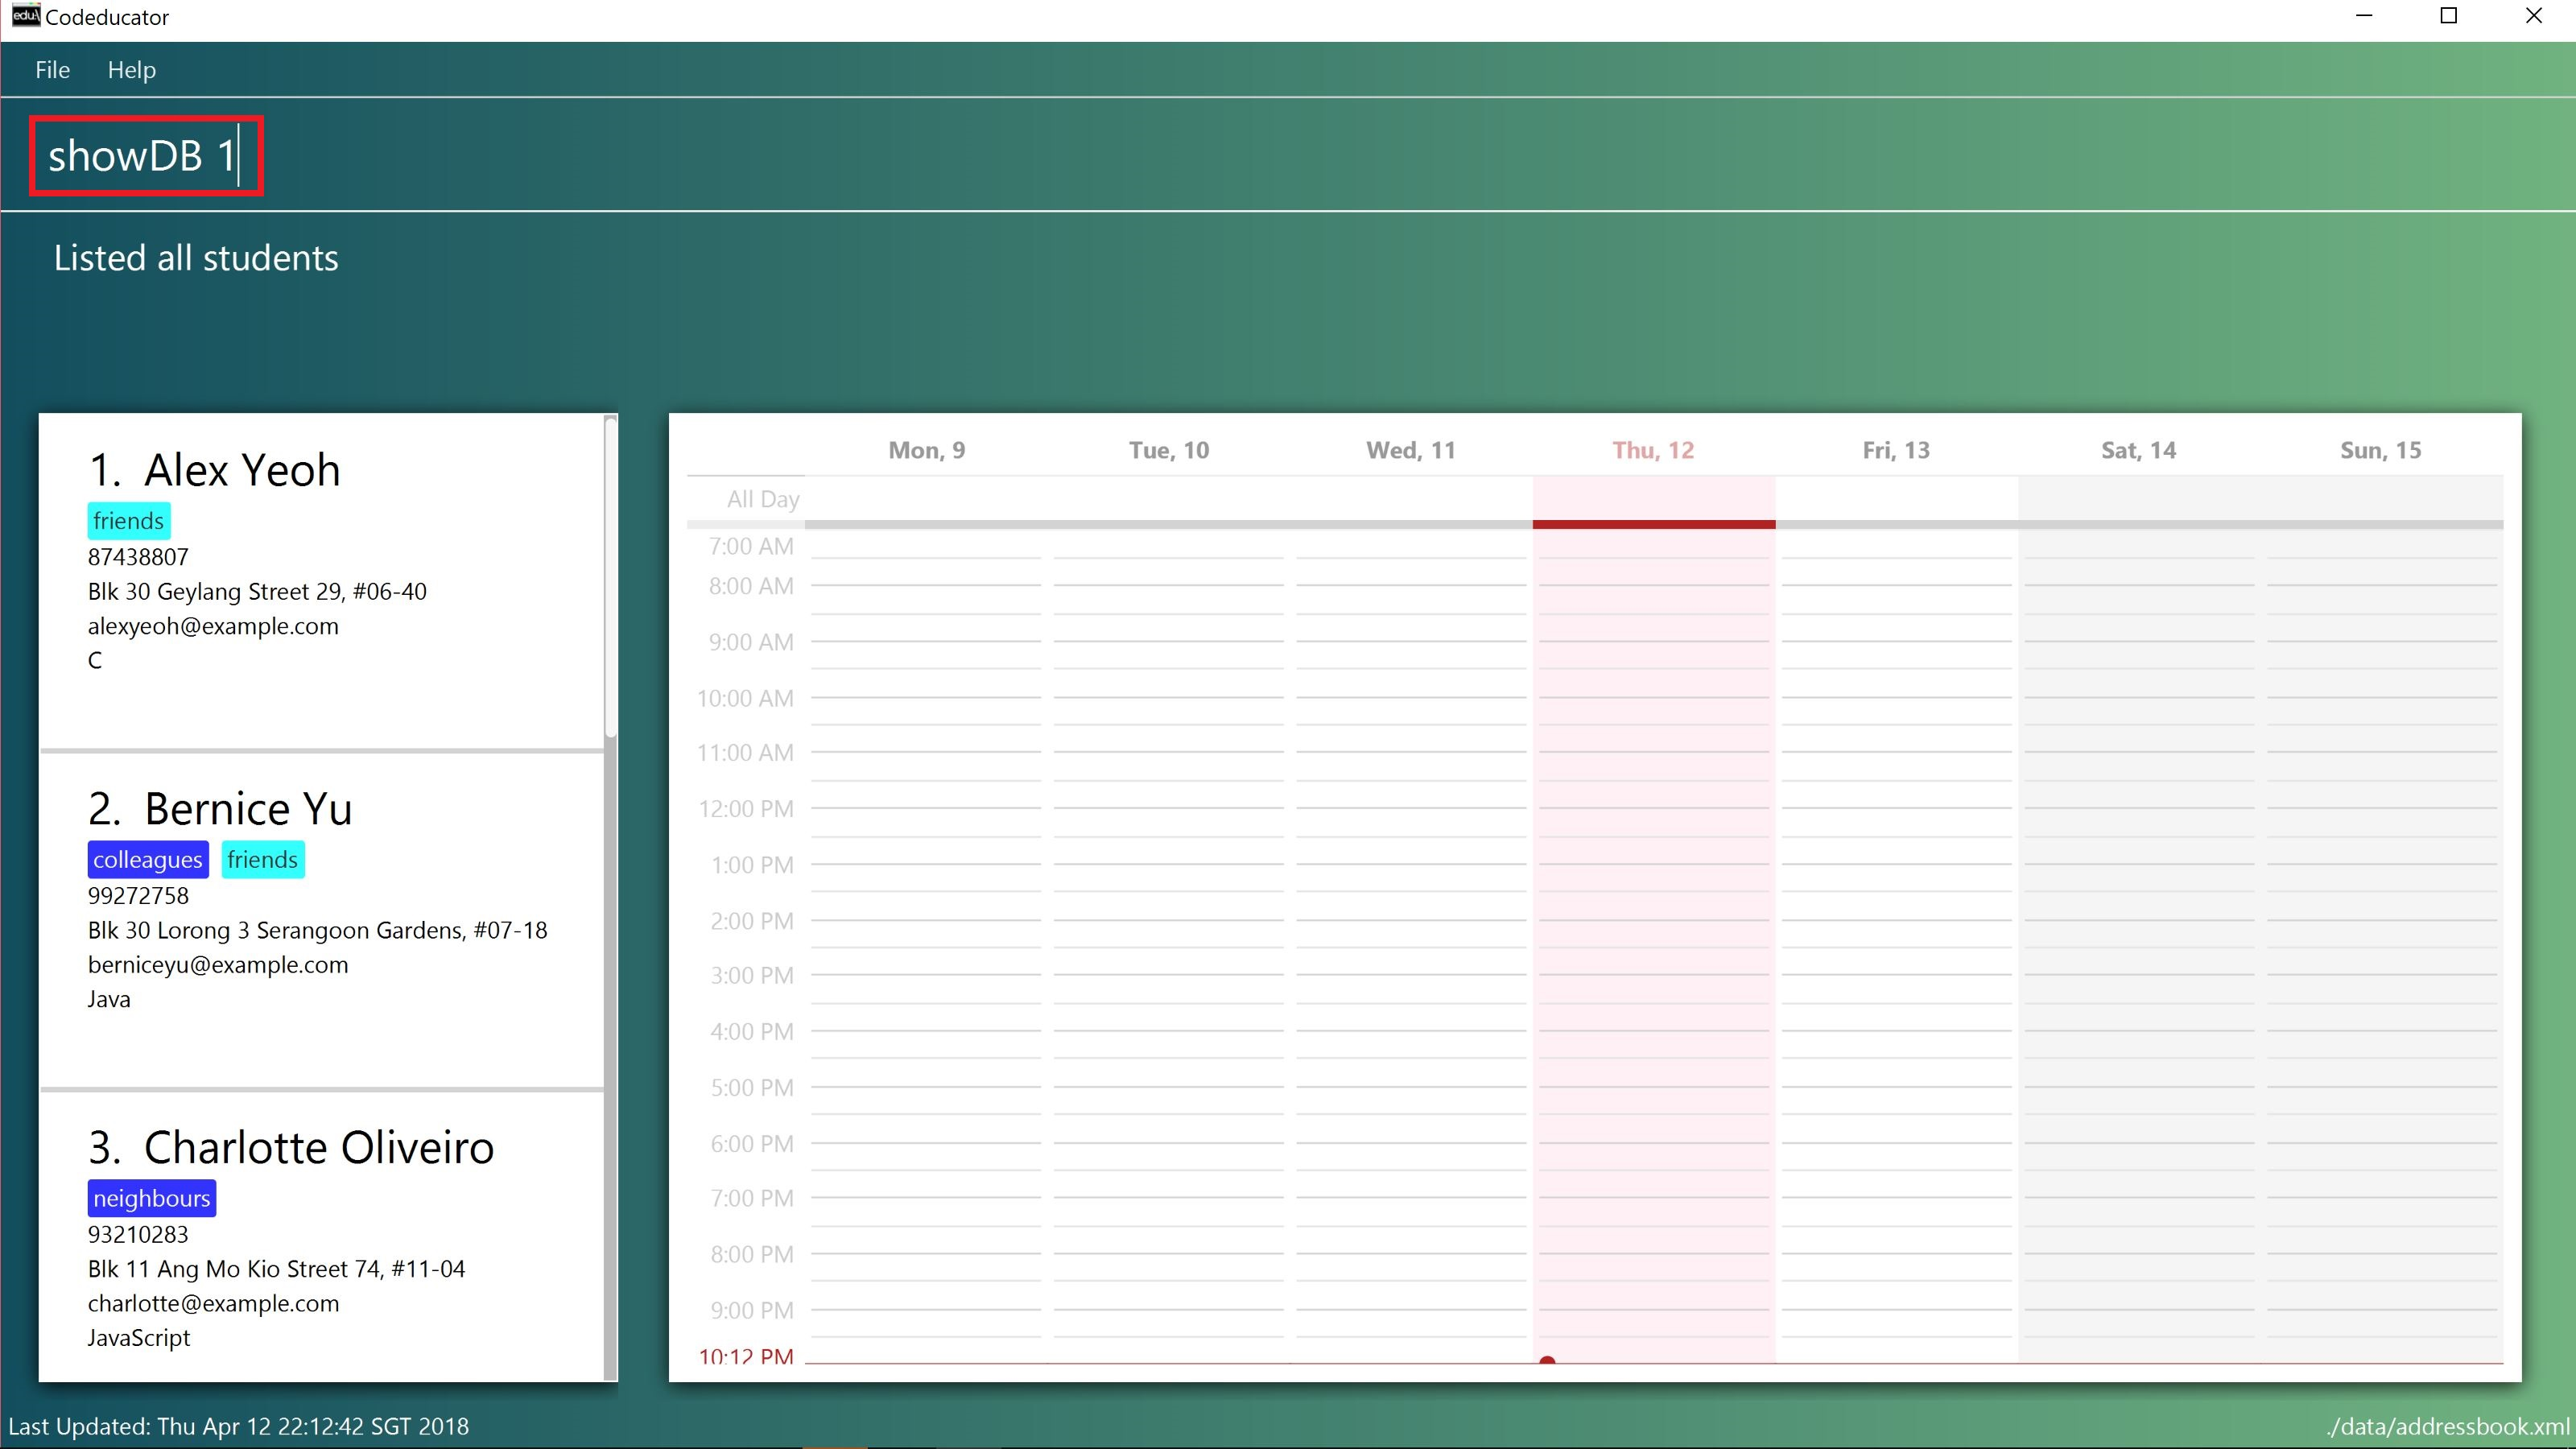
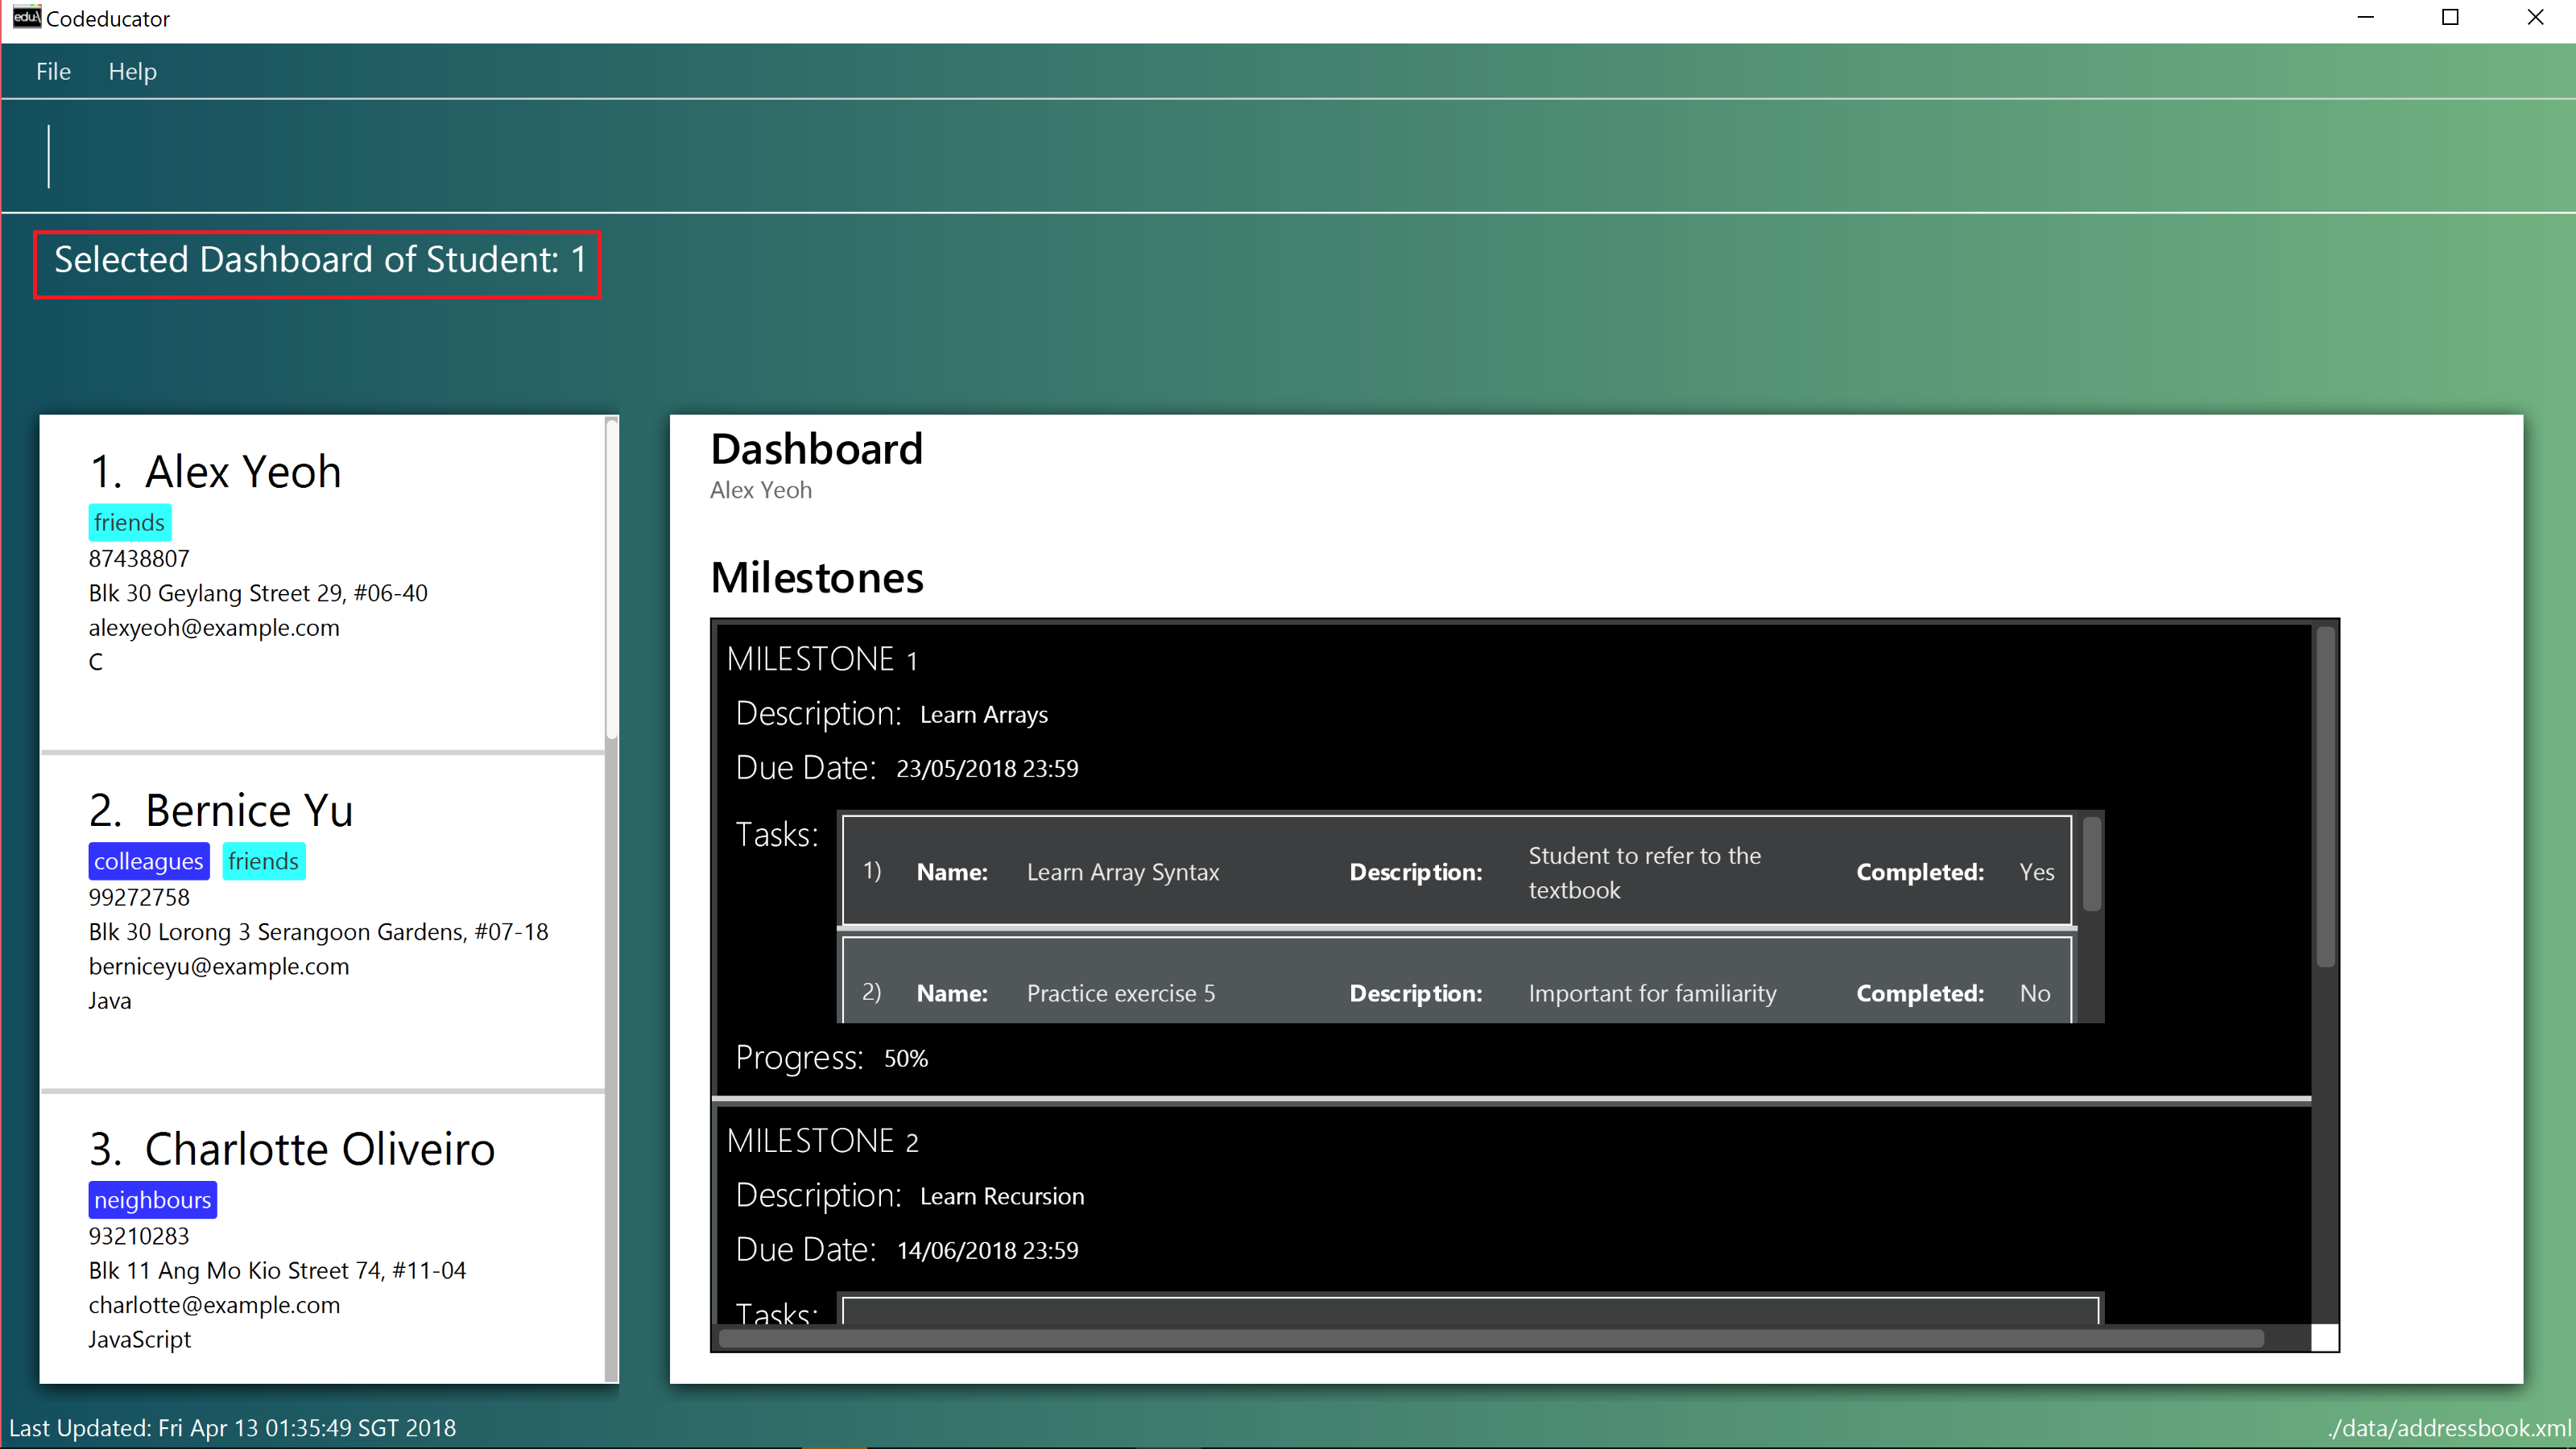
showDB command followed by the STUDENT_INDEX 1 of the student whose dashboard you wish to viewStep 3: You have succeeded in viewing the student’s dashboard if you see the message "Selected Dashboard of Student: STUDENT_INDEX " in the result box, with the dashboard containing the student’s name appearing on the right panel.
The student INDEX provided must be valid. Otherwise, an error message "The student index provided is invalid" will be displayed in the result box at Step 3.
|
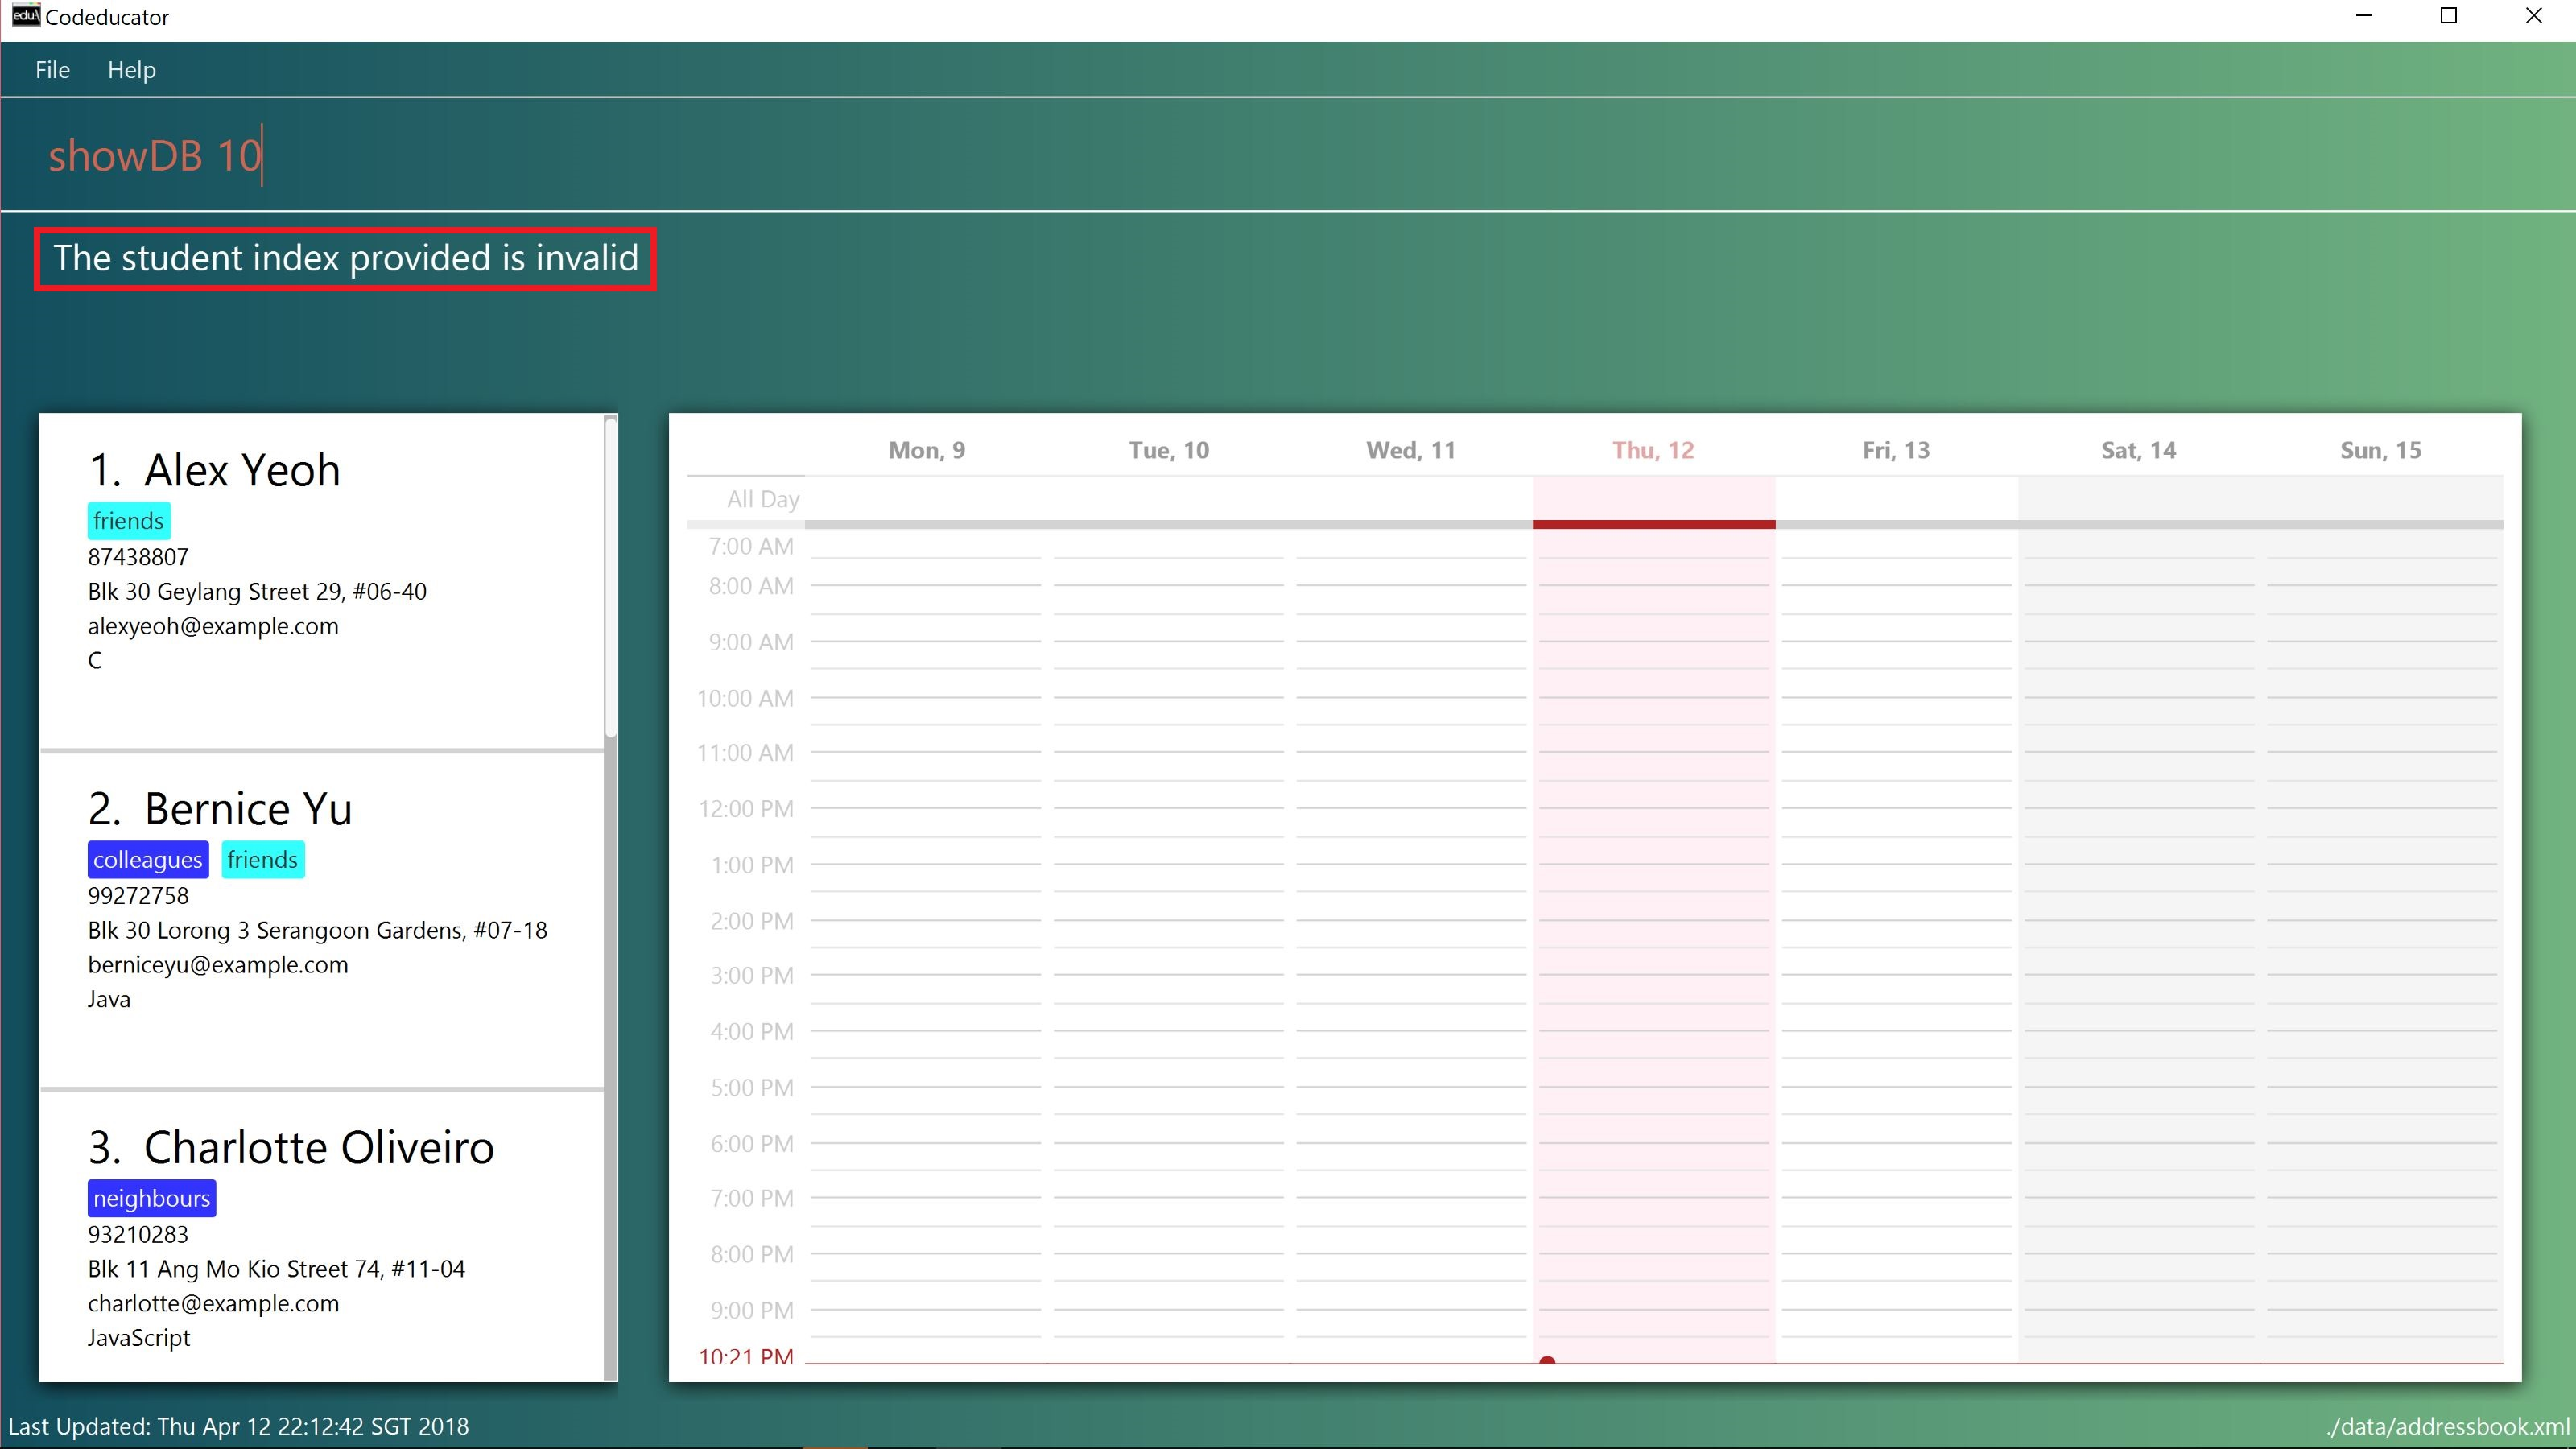
STUDENT_INDEX 10 is entered. There are less than 10 students in the student contact list.Adding a milestone to a student’s dashboard: addMS
If you want to keep track of a learning objective you want your student to fulfil, you can add a milestone to your student’s dashboard using the addMS command.
Format: addMS i/STUDENT_INDEX d/MILESTONE_DUE_DATE o/DESCRIPTION_OF_MILESTONE
Example:
-
list
showDB 1
addMS i/1 d/23/05/2018 23:59 o/Learn Arrays
Adds a milestone to the dashboard of the 1st student in the address book. The milestone is due on 23/05/2018 23:59 and the objective is "Learn Arrays".
Steps taken to add a milestone to a dashboard
Step 1: First, view the dashboard of the student where you want to add the milestone to (see [Show the dashboard of a student: showDB]).
Step 2: Once you can view the student’s dashboard, type addMS in the command box, followed by the STUDENT_INDEX, MILESTONE_DUE_DATE and DESCRIPTION_OF_MILESTONE. Press Enter to execute it.
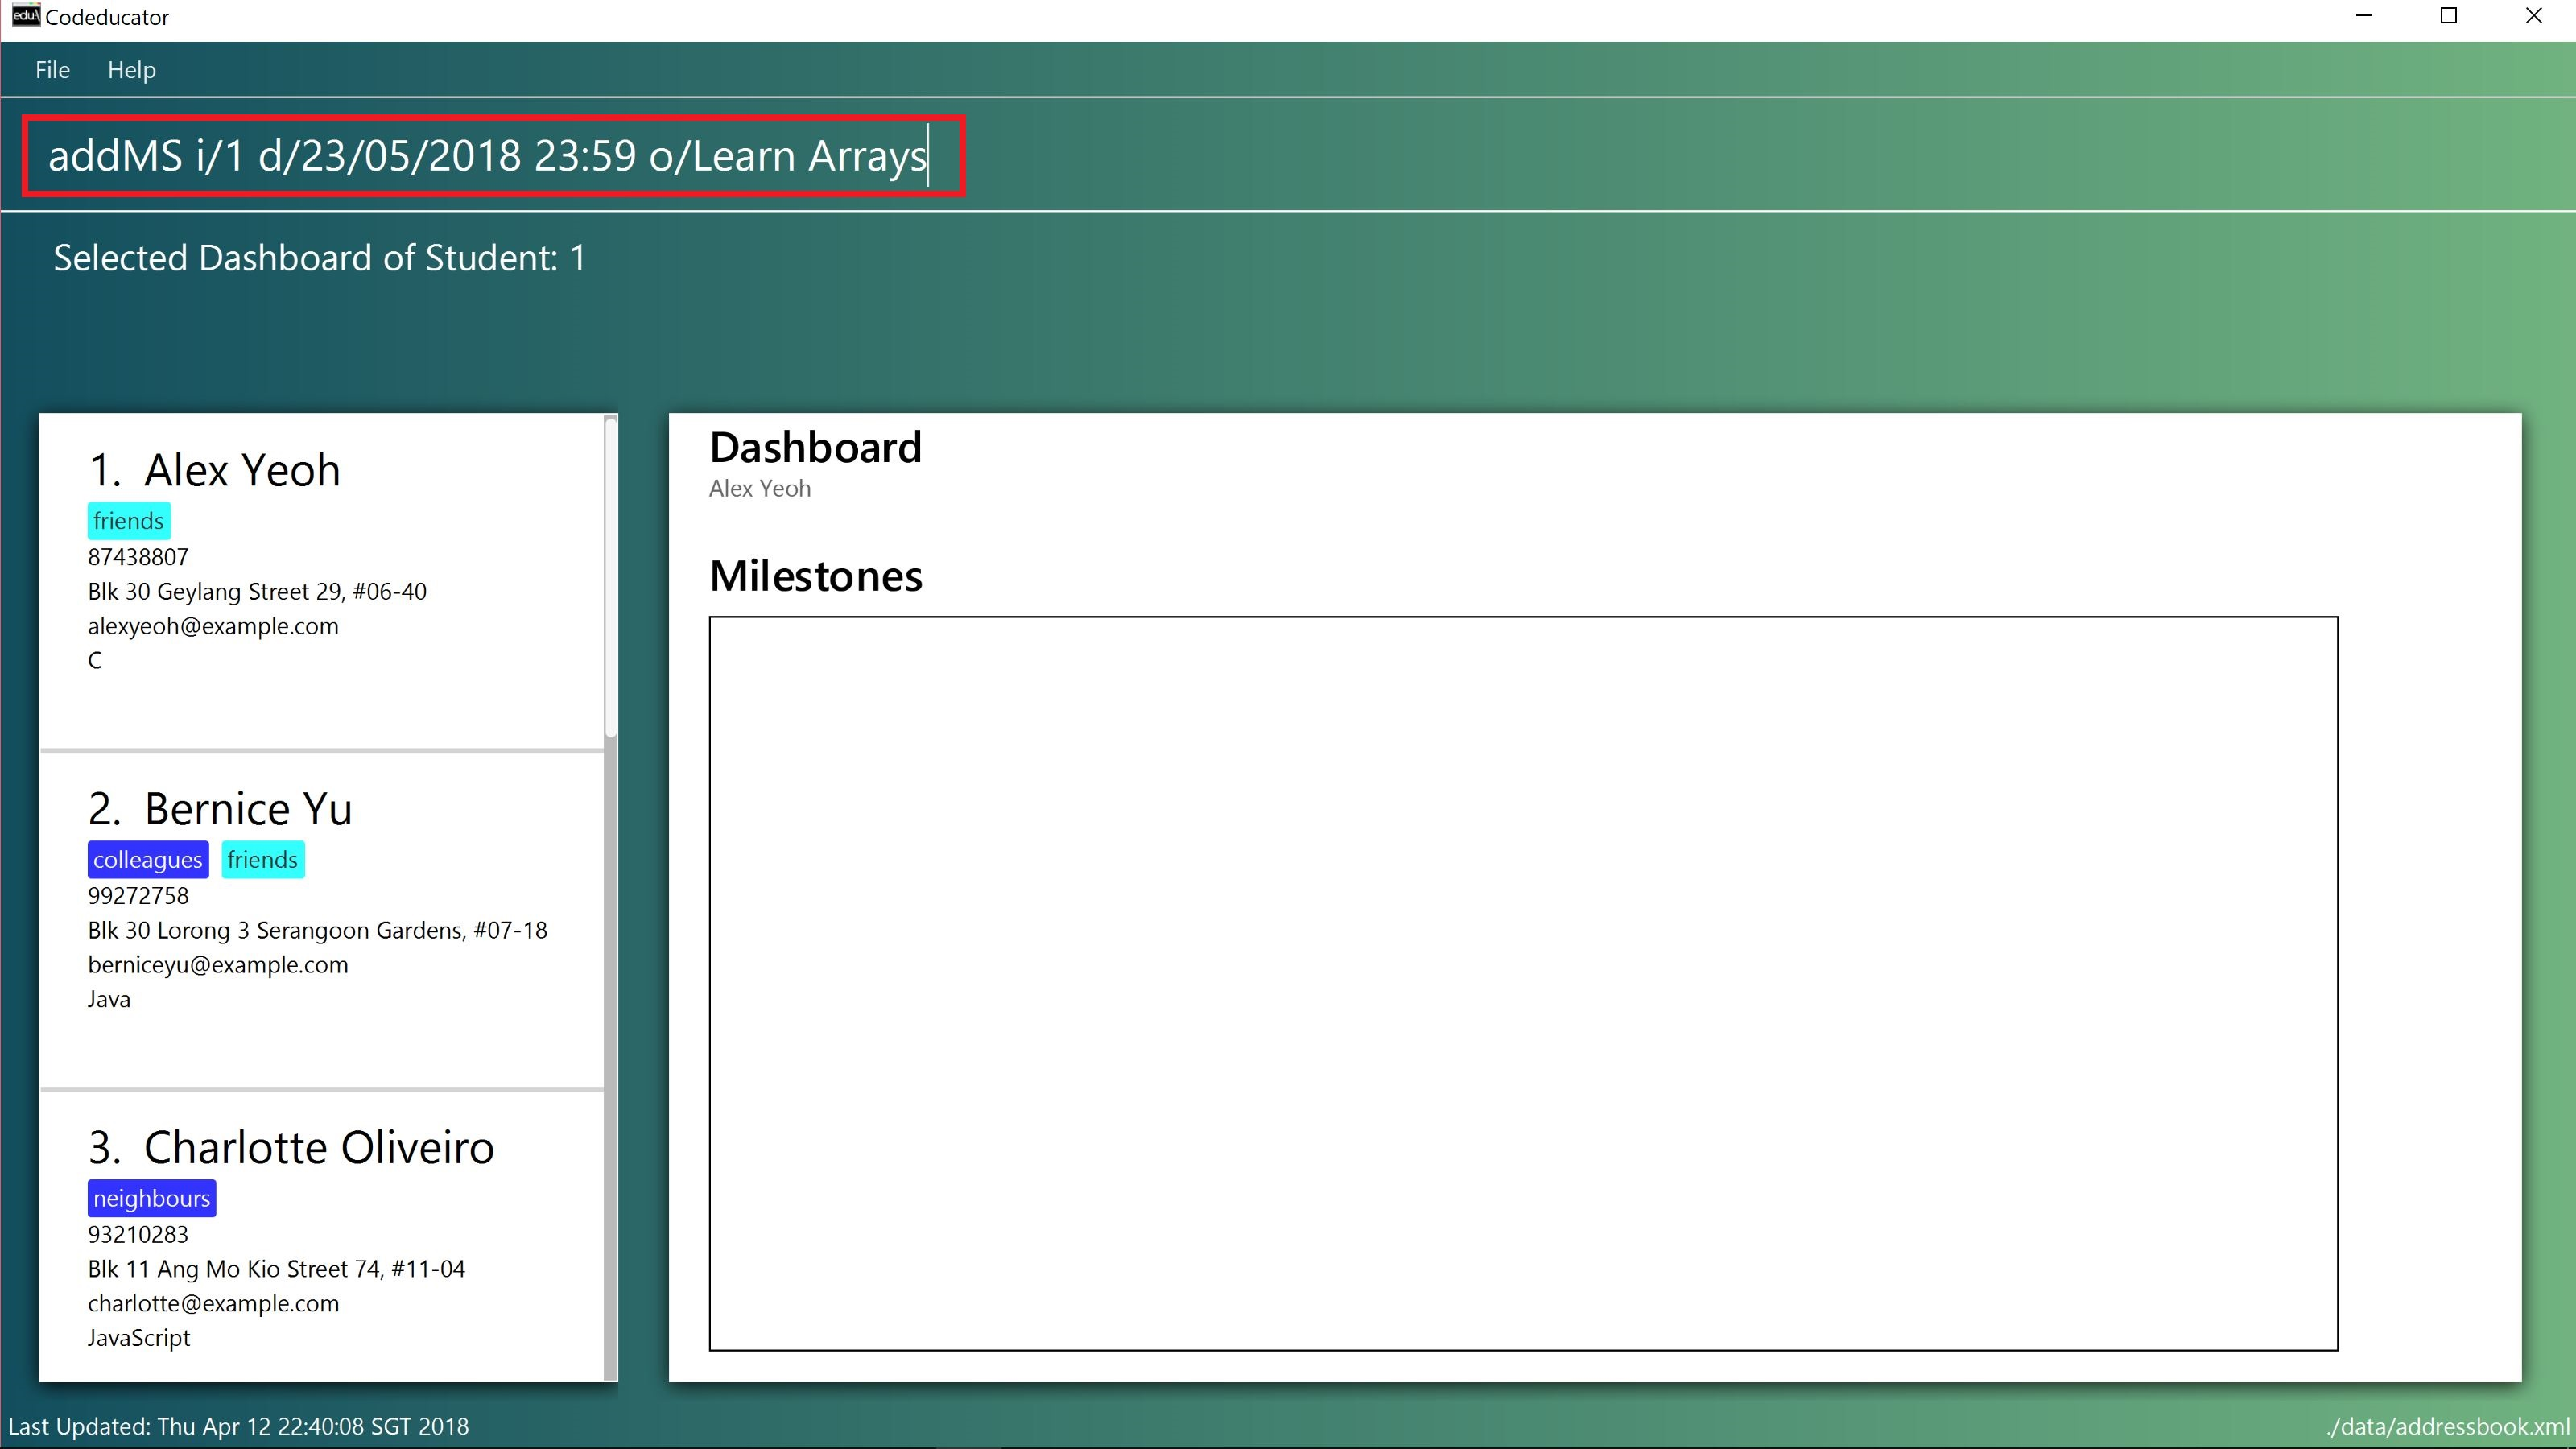
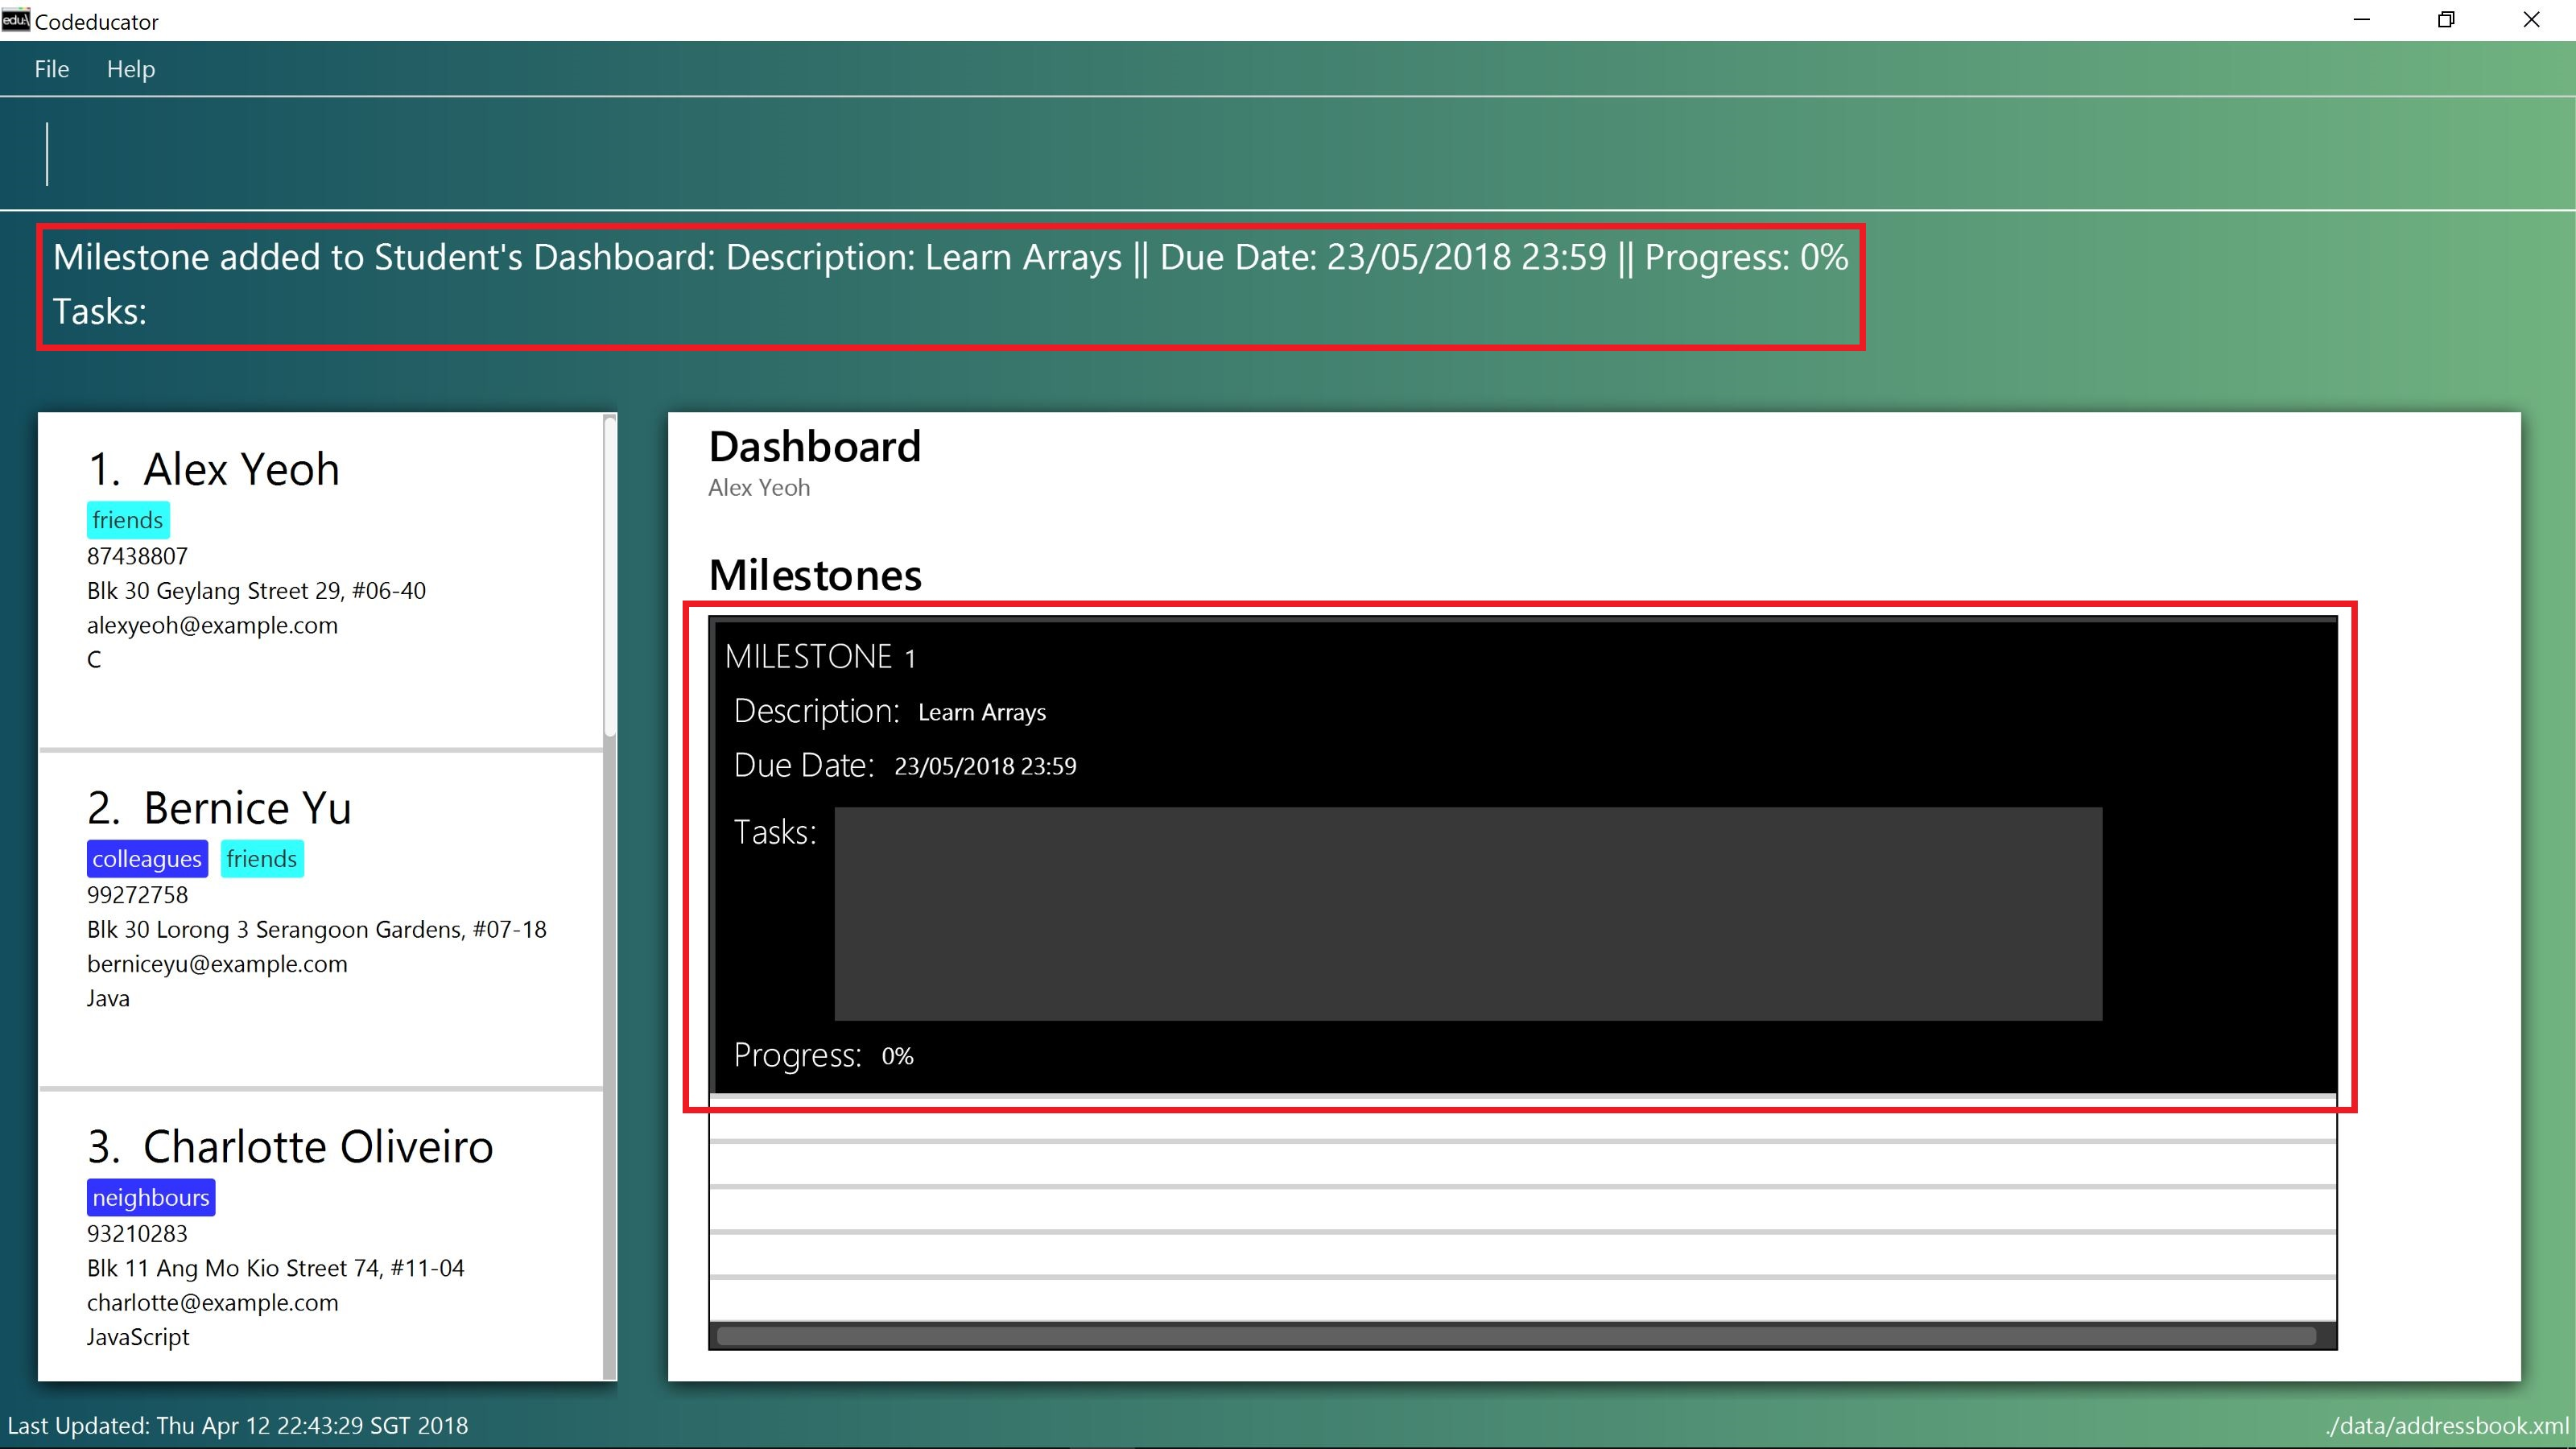
addMS command, followed by the STUDENT_INDEX as "1", MILESTONE_DUE_DATE as "23/05/2018 23:59" and DESCRIPTION_OF_MILESTONE as "Learn Arrays"Step 3: You have succeeded in adding the milestone to the student’s dashboard if you see the message "Milestone added to Student’s Dashboard:" followed by the description of the milestone you have added in the result box. The new milestone will also appear on the student’s dashboard.
The STUDENT_INDEX provided must be valid. Otherwise, an error message "The student index provided is invalid" will be displayed in the result box at Step 3.
|
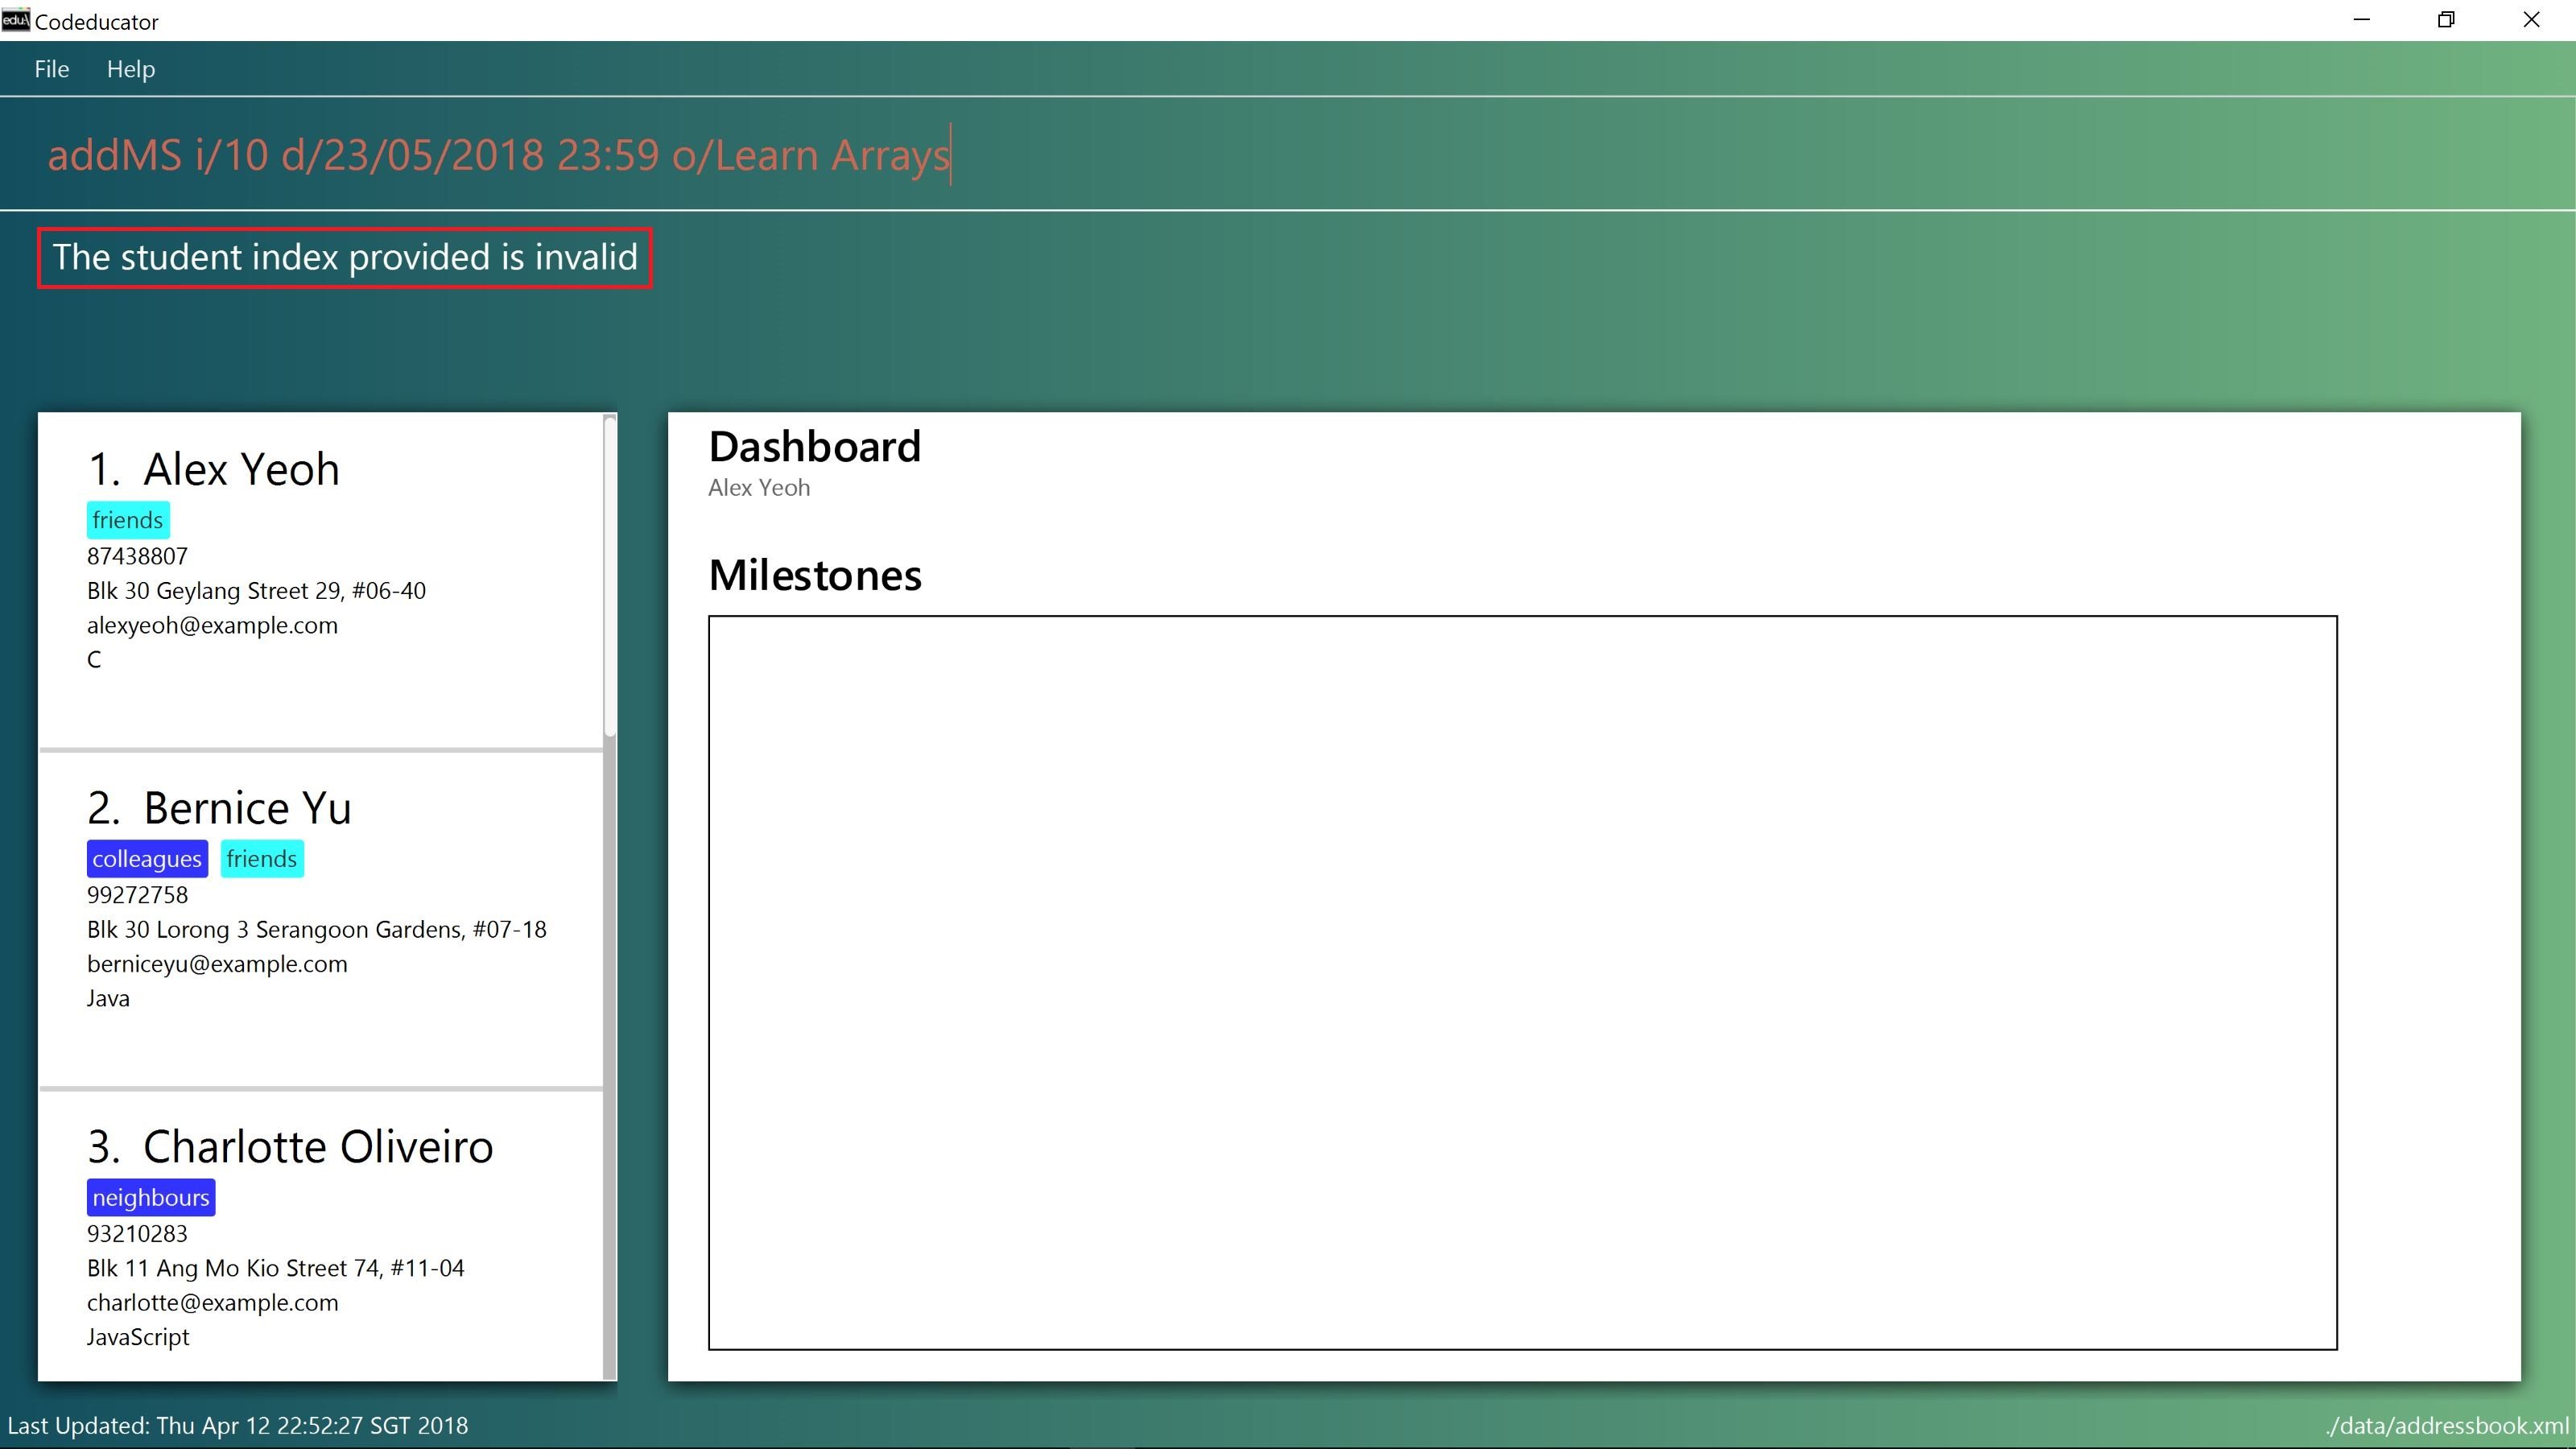
STUDENT_INDEX 10 is entered. There are less than 10 students in the student contact list.
The MILESTONE_DUE_DATE provided must have a valid calendar date and follows the specified format. Otherwise, an error message shown in the figure below will be displayed in the result box at Step 3. |
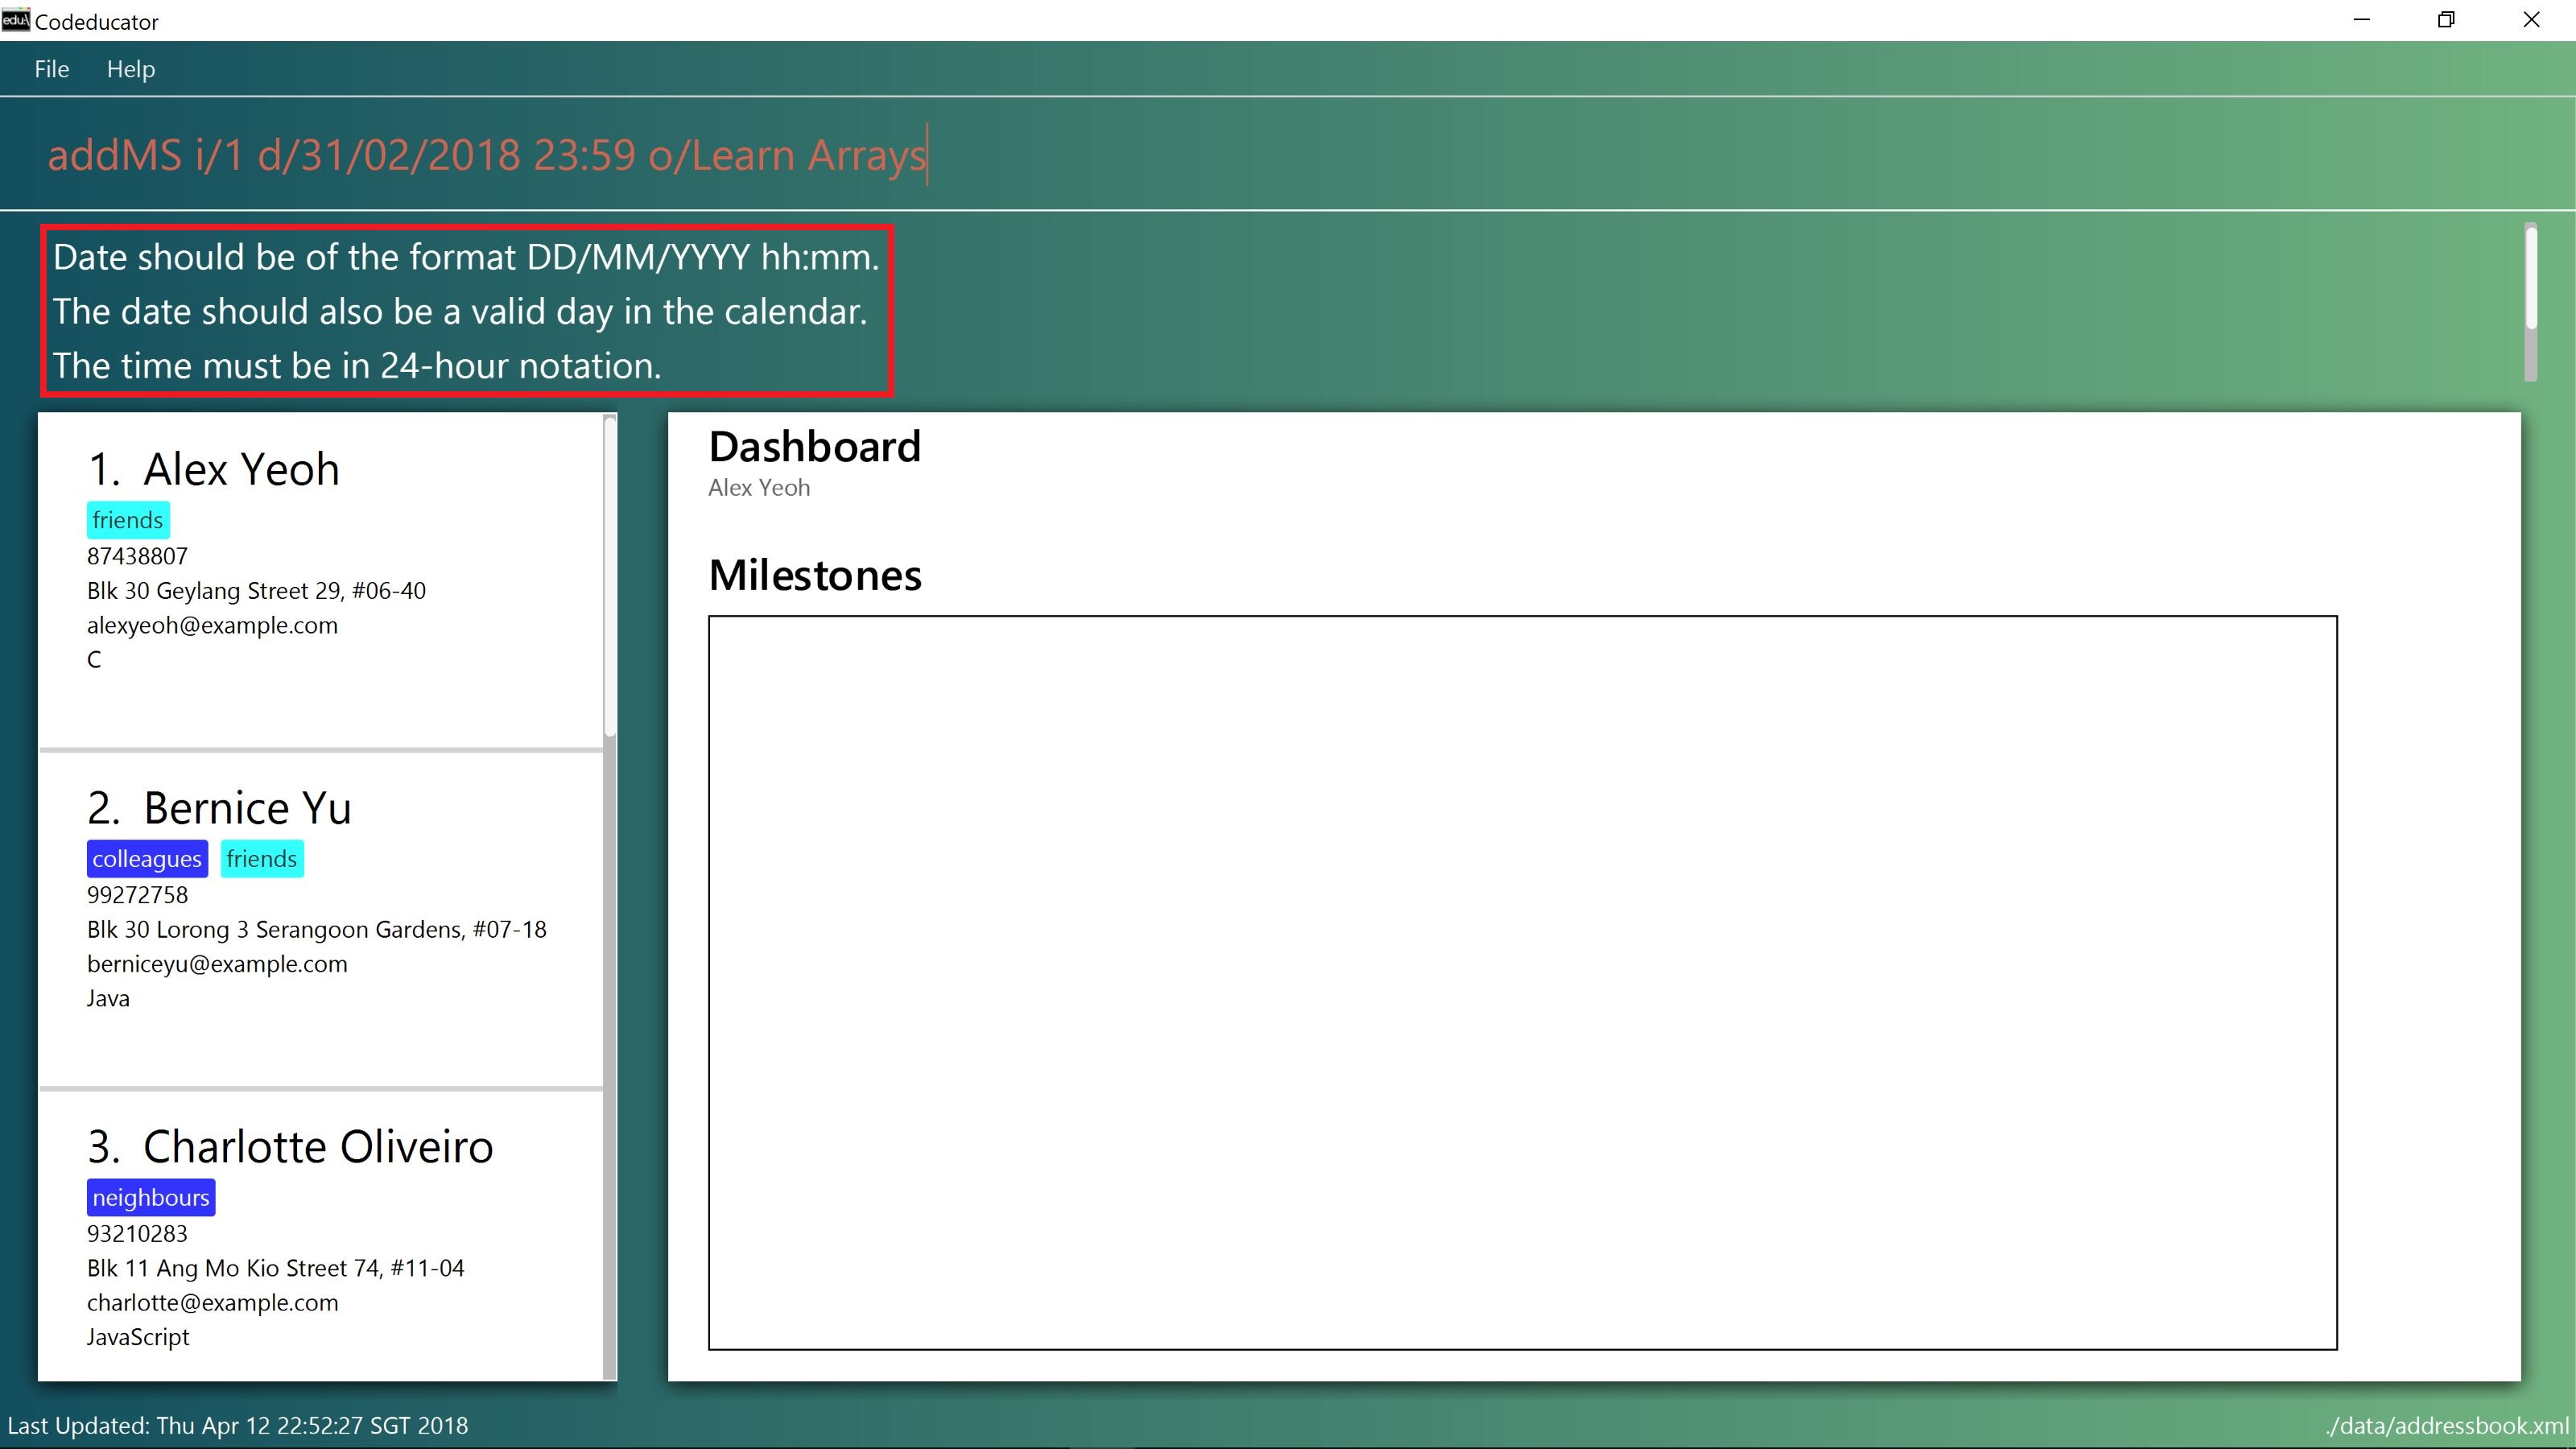
MILESTONE_DUE_DATE "31/02/2018 23:59" is entered. There is no 31/02/2018 in the calendar.Deleting a milestone from a student’s dashboard: deleteMS
If you wish to remove a milestone you no longer need from a student’s dashboard, you can use the deleteMS command.
Format: deleteMS i/STUDENT_INDEX m/MILESTONE_INDEX
Examples:
-
list
showDB 1
deleteMS i/1 m/1
Deletes the 1st milestone from the dashboard of the 1st student in the address book.
Steps taken to delete a milestone from a dashboard
Step 1: First, view the dashboard of the student where you want to remove the milestone from (see [Show the dashboard of a student: showDB]).
Step 2: Once you can view the student’s dashboard, type deleteMS in the command box, followed by the STUDENT_INDEX and MILESTONE_INDEX. Press Enter to execute it.
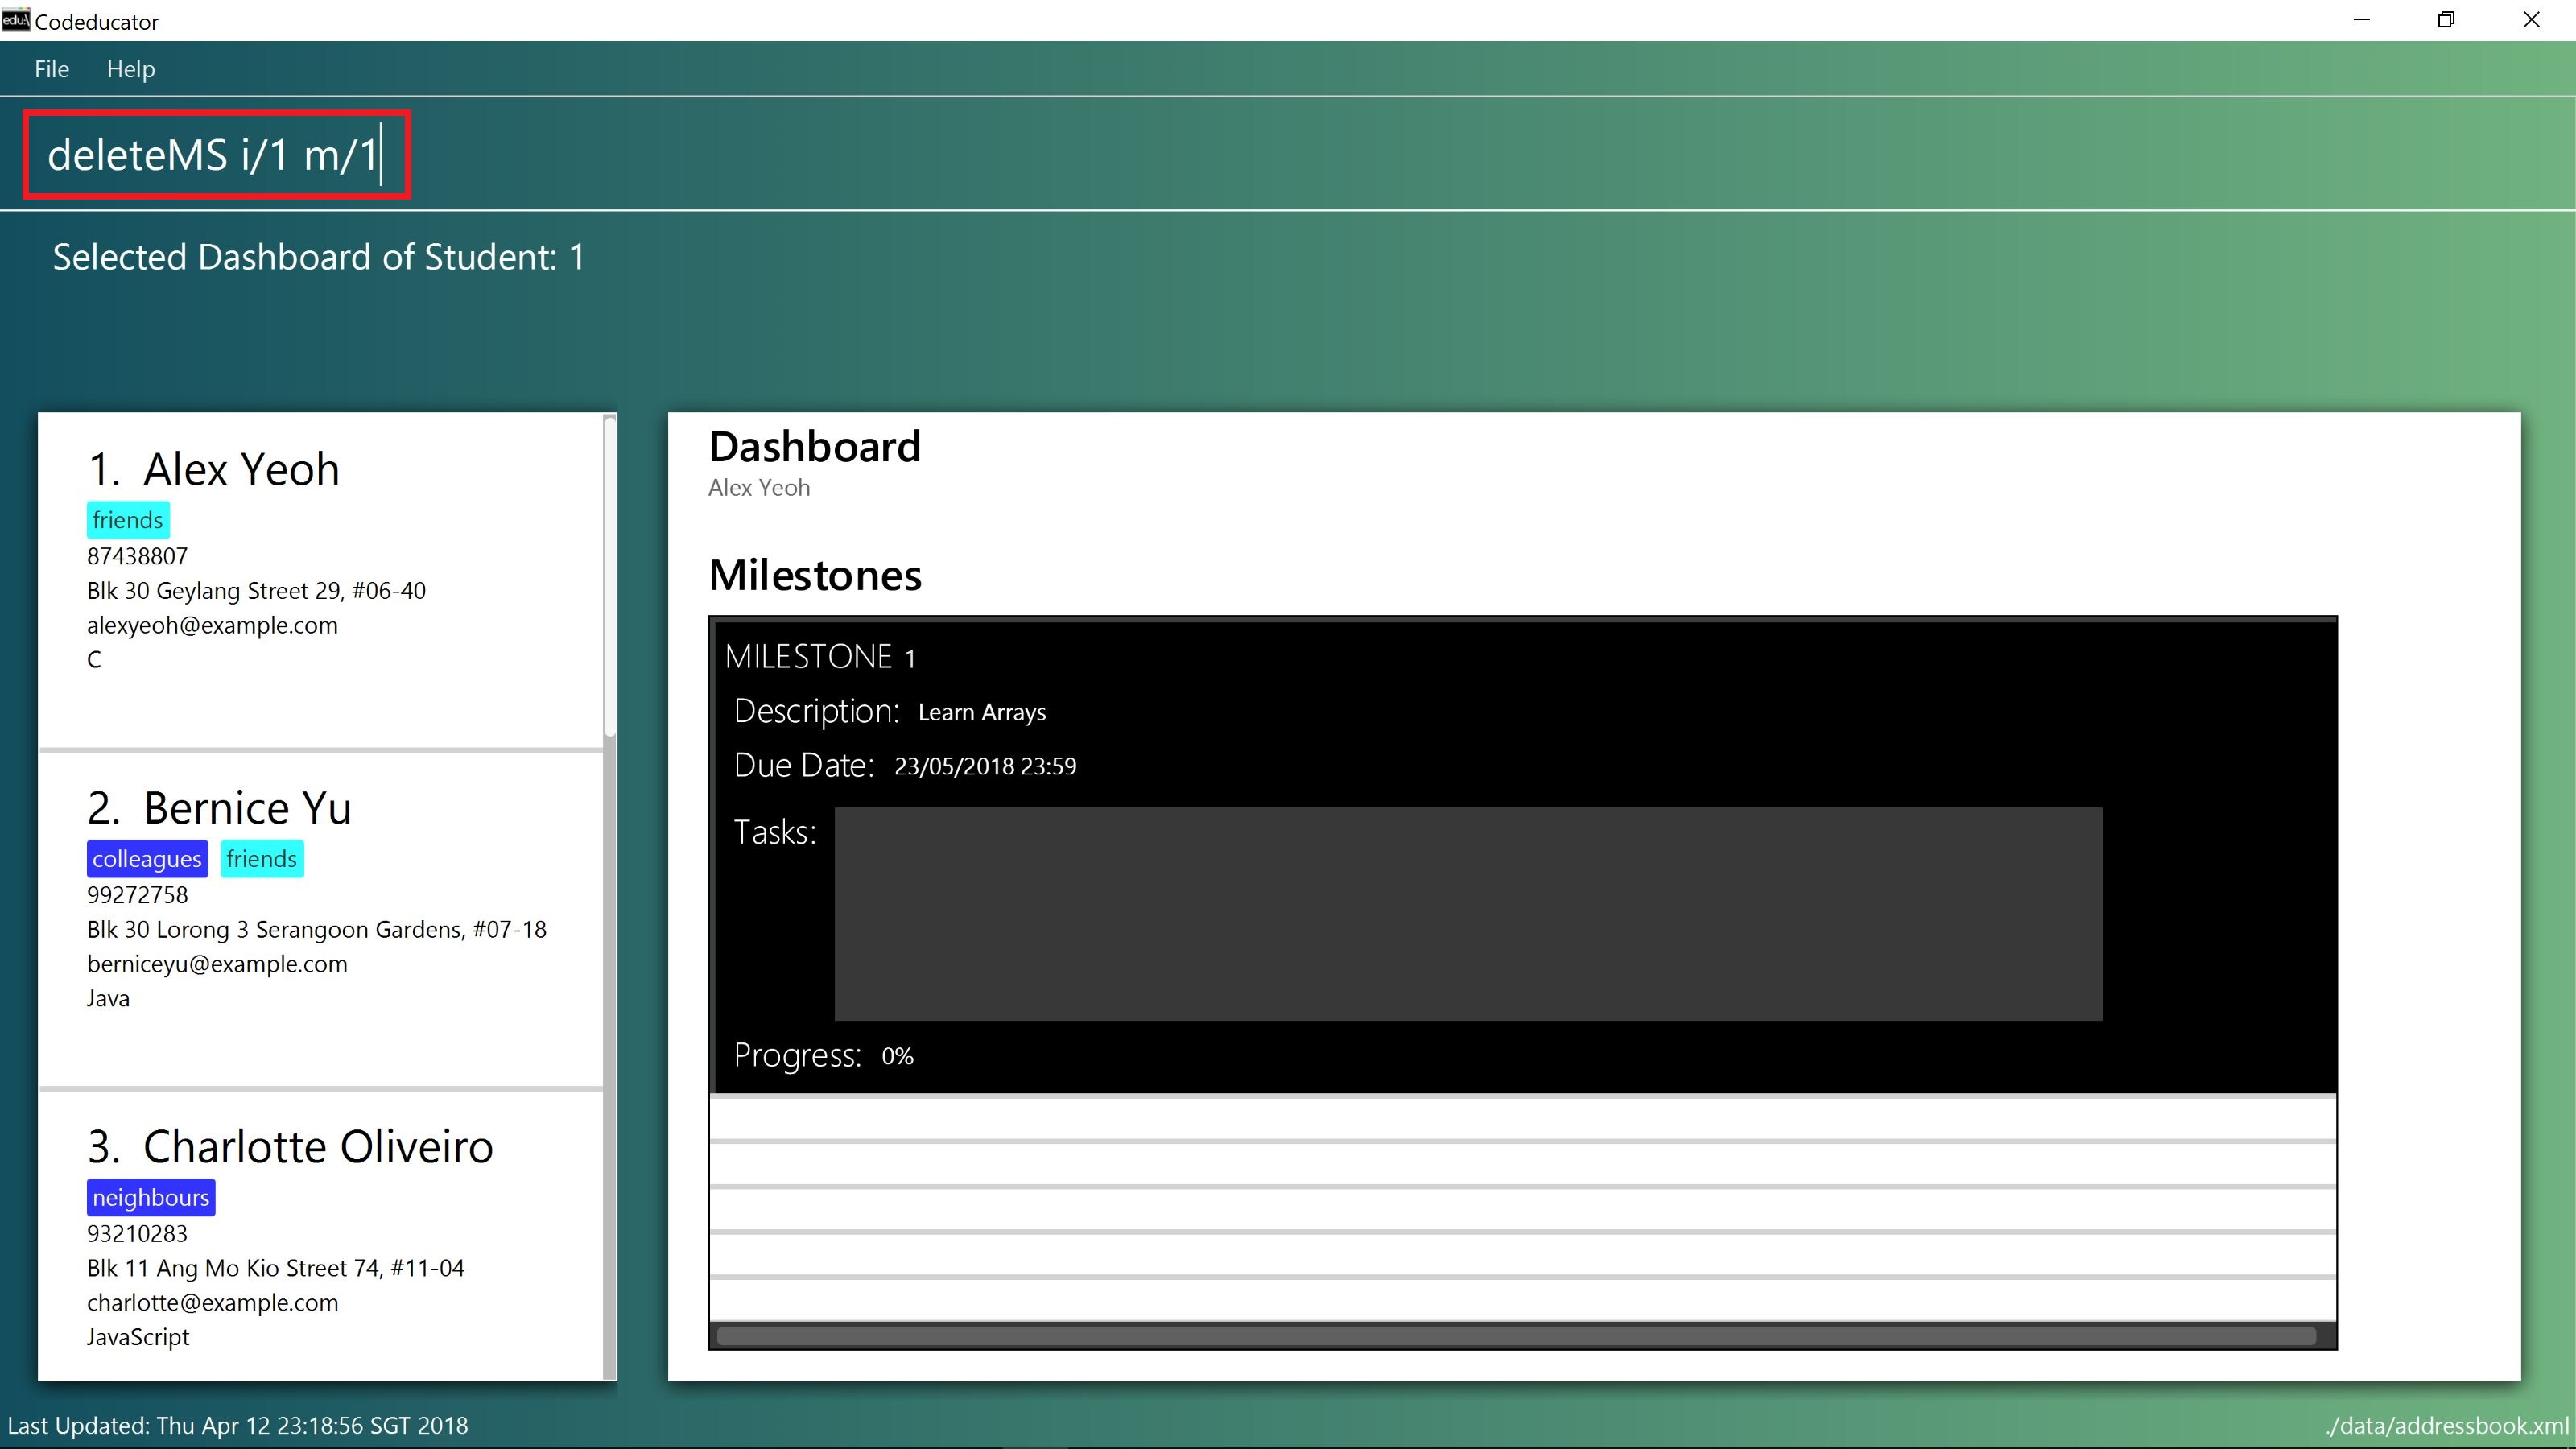
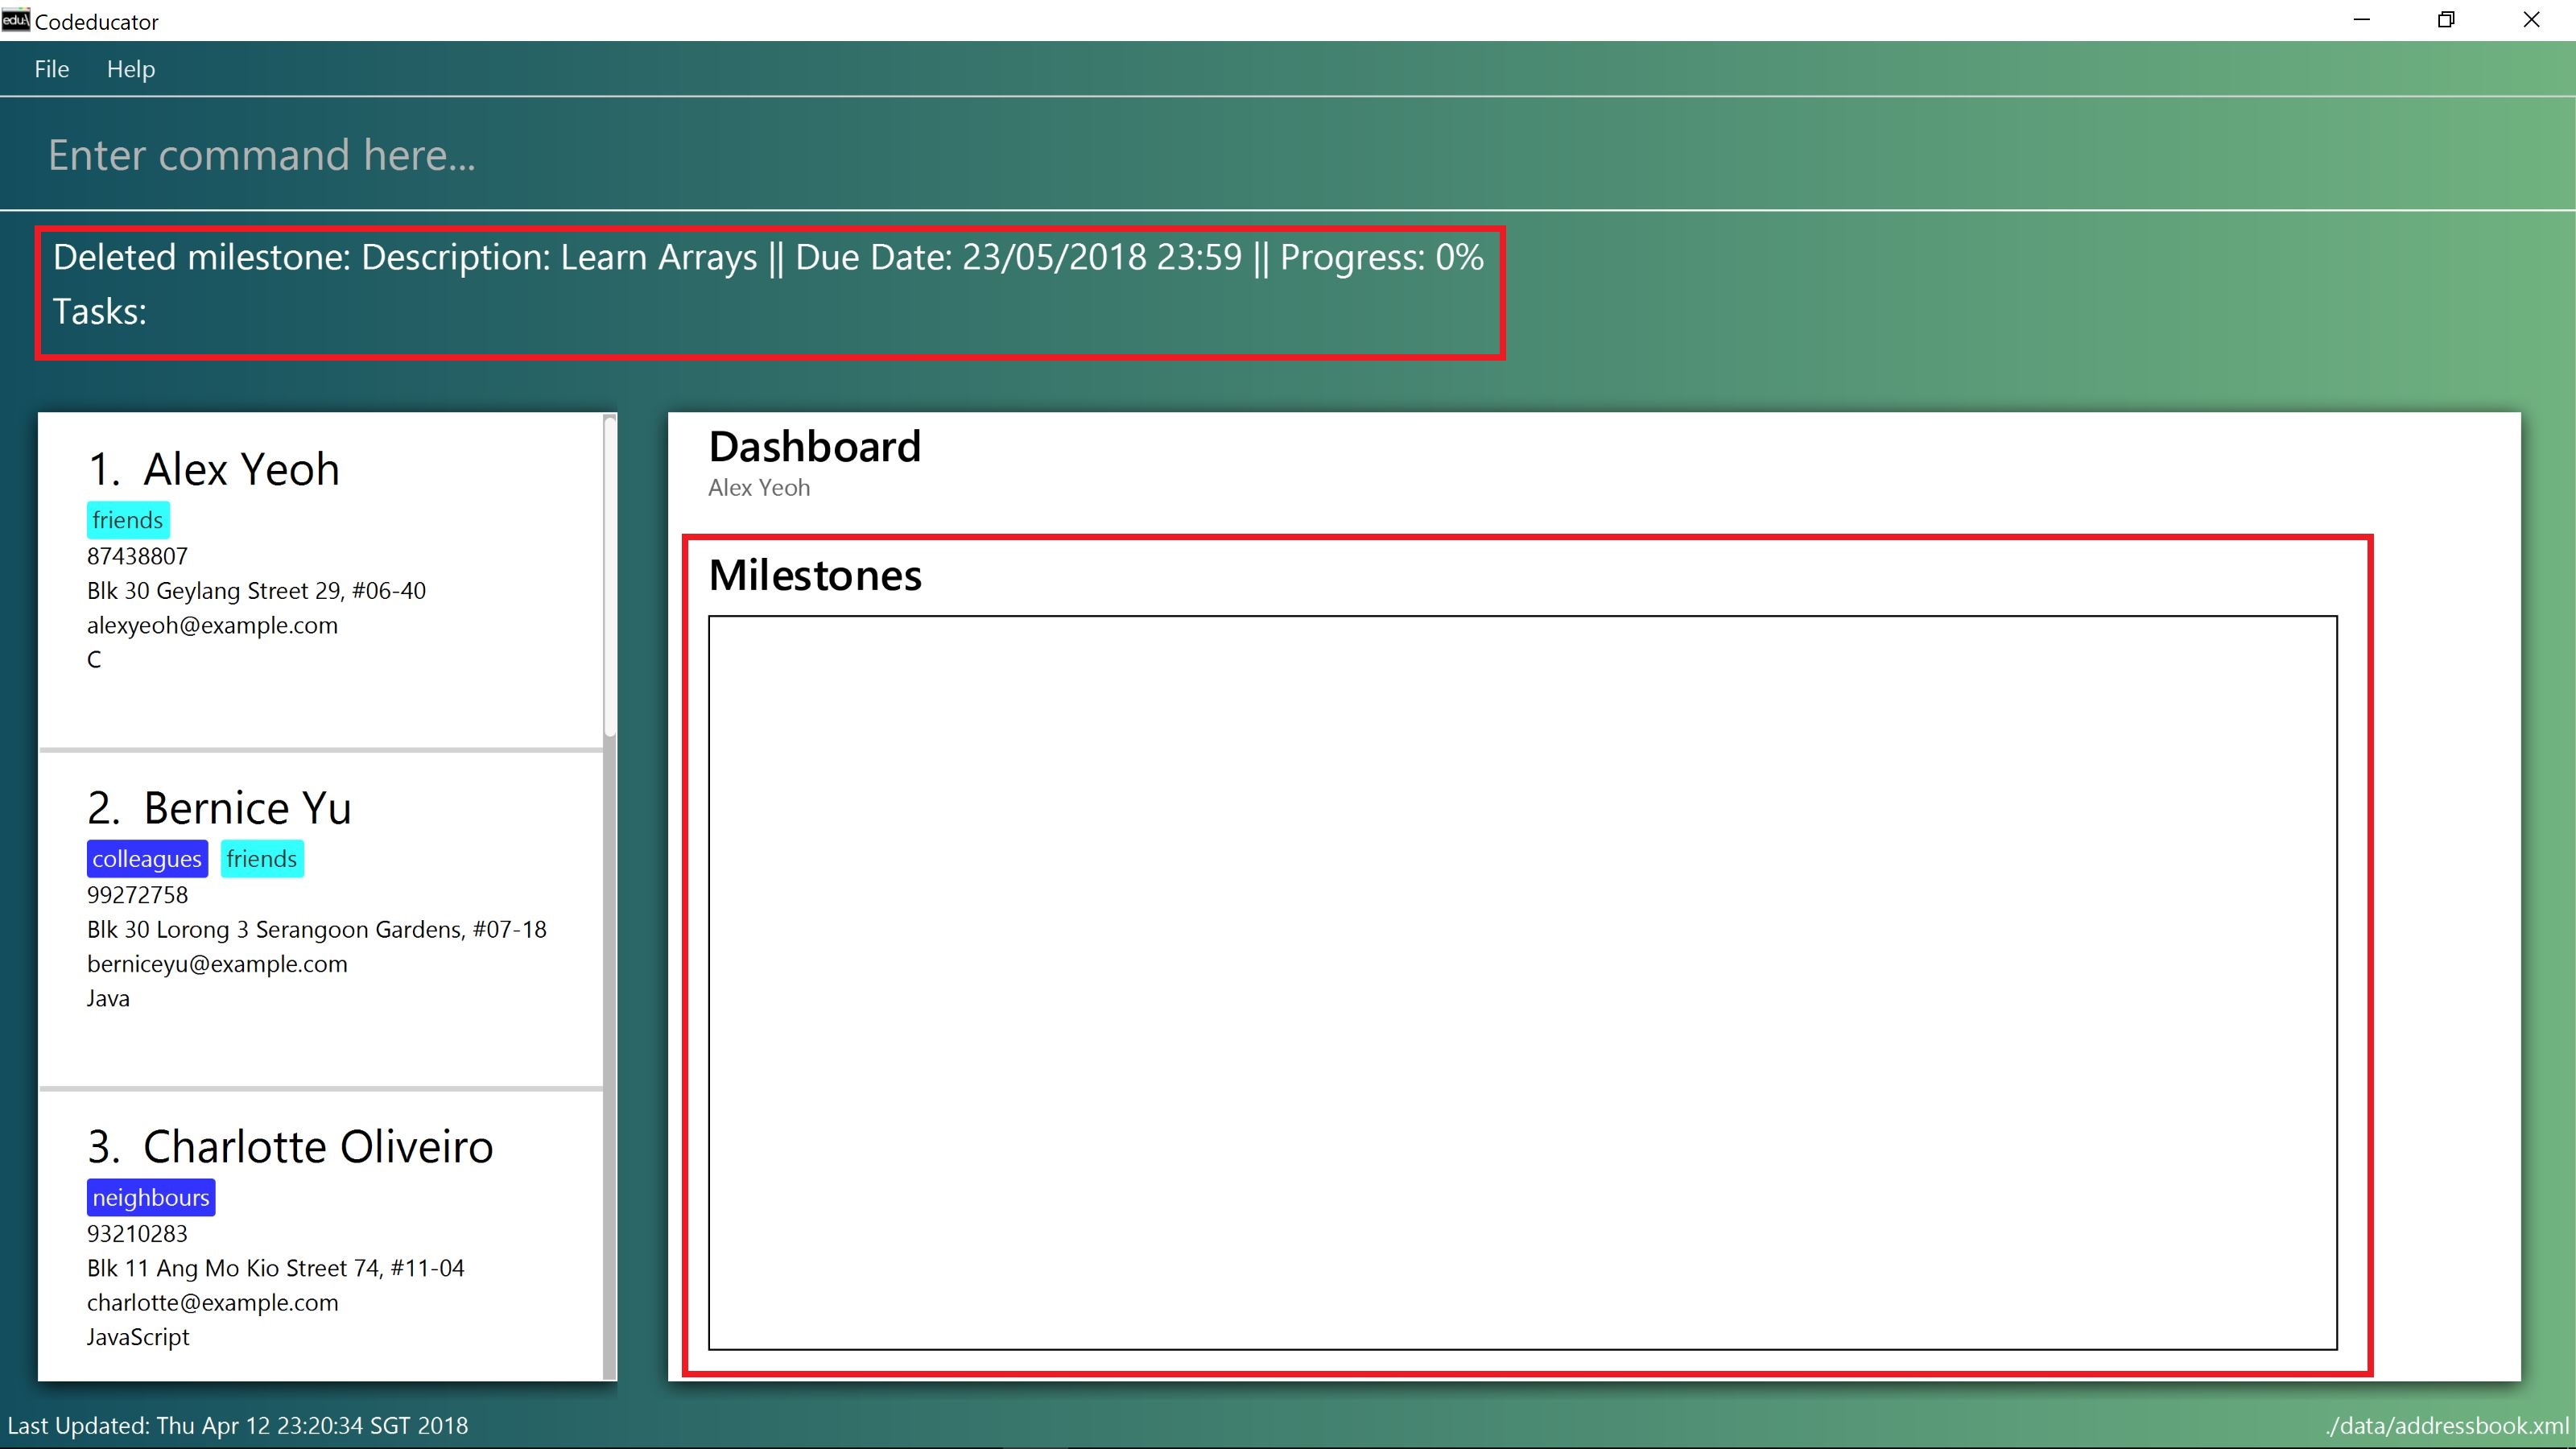
deleteMS command, followed by the STUDENT_INDEX as "1" and MILESTONE_INDEX as "1"Step 3: You have succeeded in deleting the milestone if you see the message "Deleted milestone:" followed by the description of the milestone in the result box. The milestone will also no longer be on the dashboard of the student.
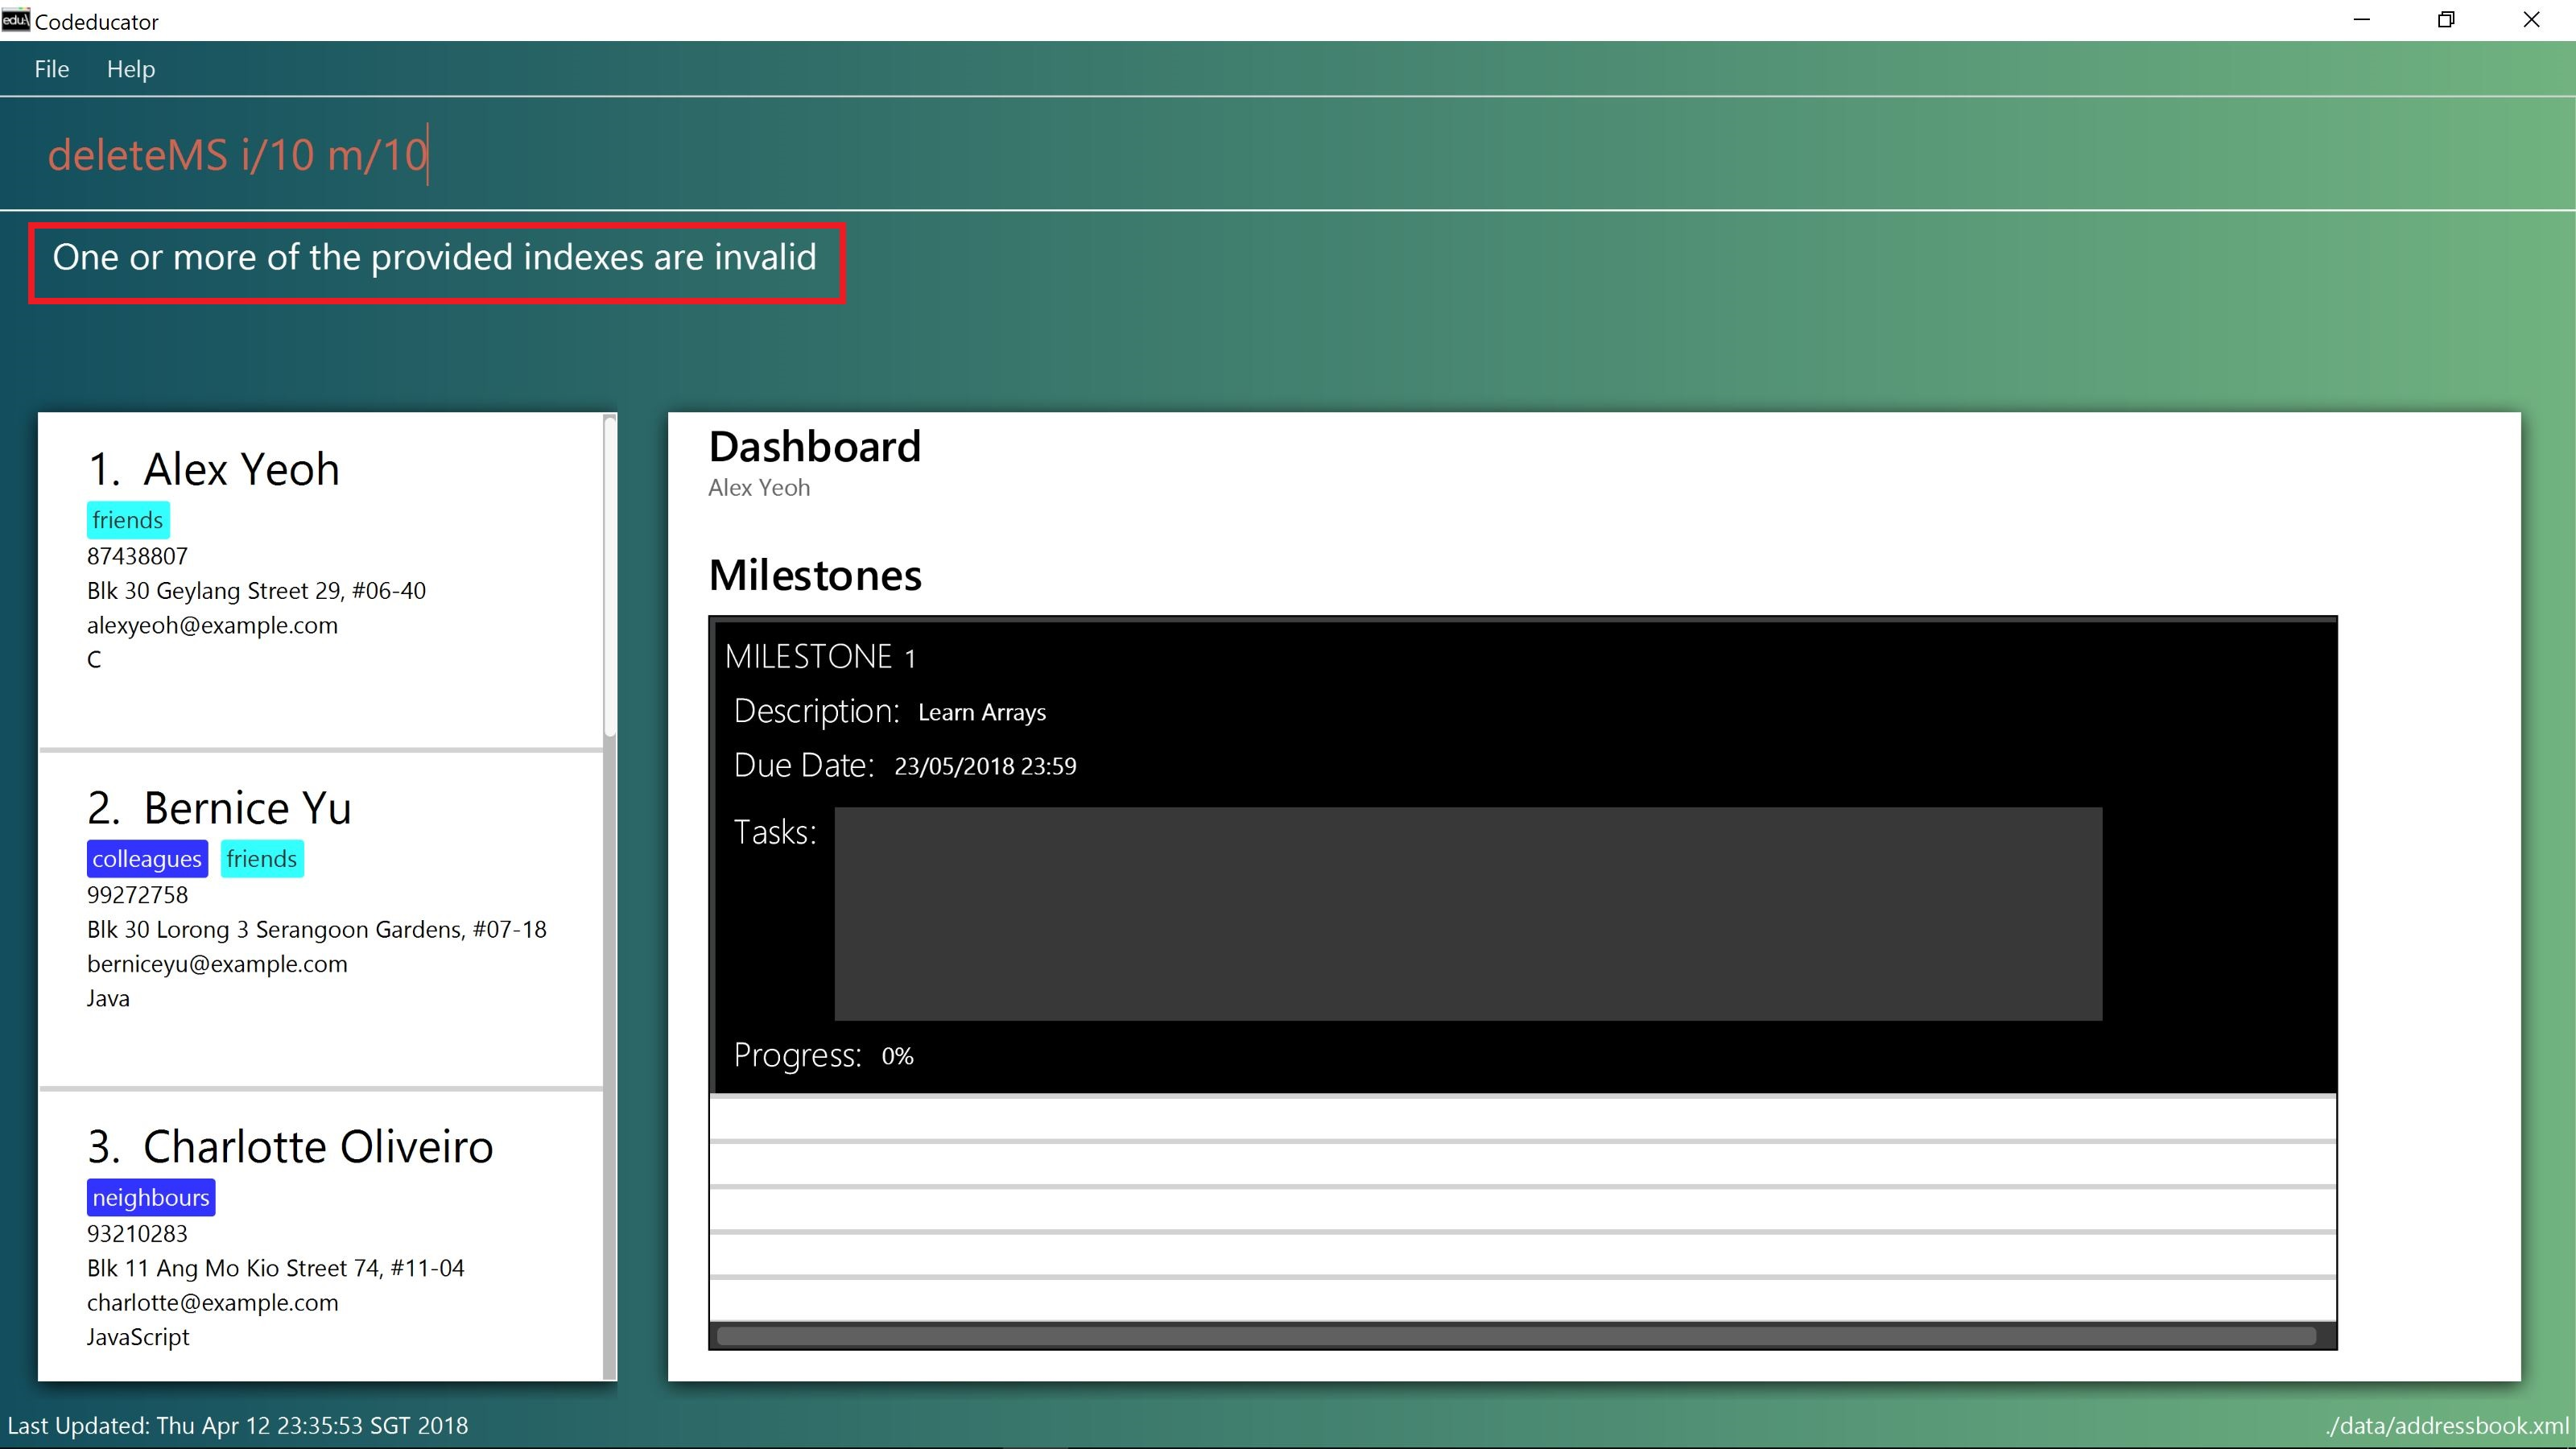
The STUDENT_INDEX and MILESTONE_INDEX provided must be valid. Otherwise, an error message "One or more of the provided indexes are invalid" will be displayed in the result box at Step 3.
|
STUDENT_INDEX "10" and MILESTONE_INDEX "10" are enteredContributions to the Developer Guide
Given below are sections I contributed to the Developer Guide. They showcase my ability to write technical documentation and the technical depth of my contributions to the project. |
Dashboard feature
The dashboard feature aims to help users keep track of their students' learning progress.
Current Implementation
To have a dashboard for each student, an association with a new Dashboard class is added to the Student class. We have also created new classes associated with the Dashboard class to facilitate the different capabilities of the dashboard.
The following diagram shows the class diagram of the components that facilitate the dashboard feature:
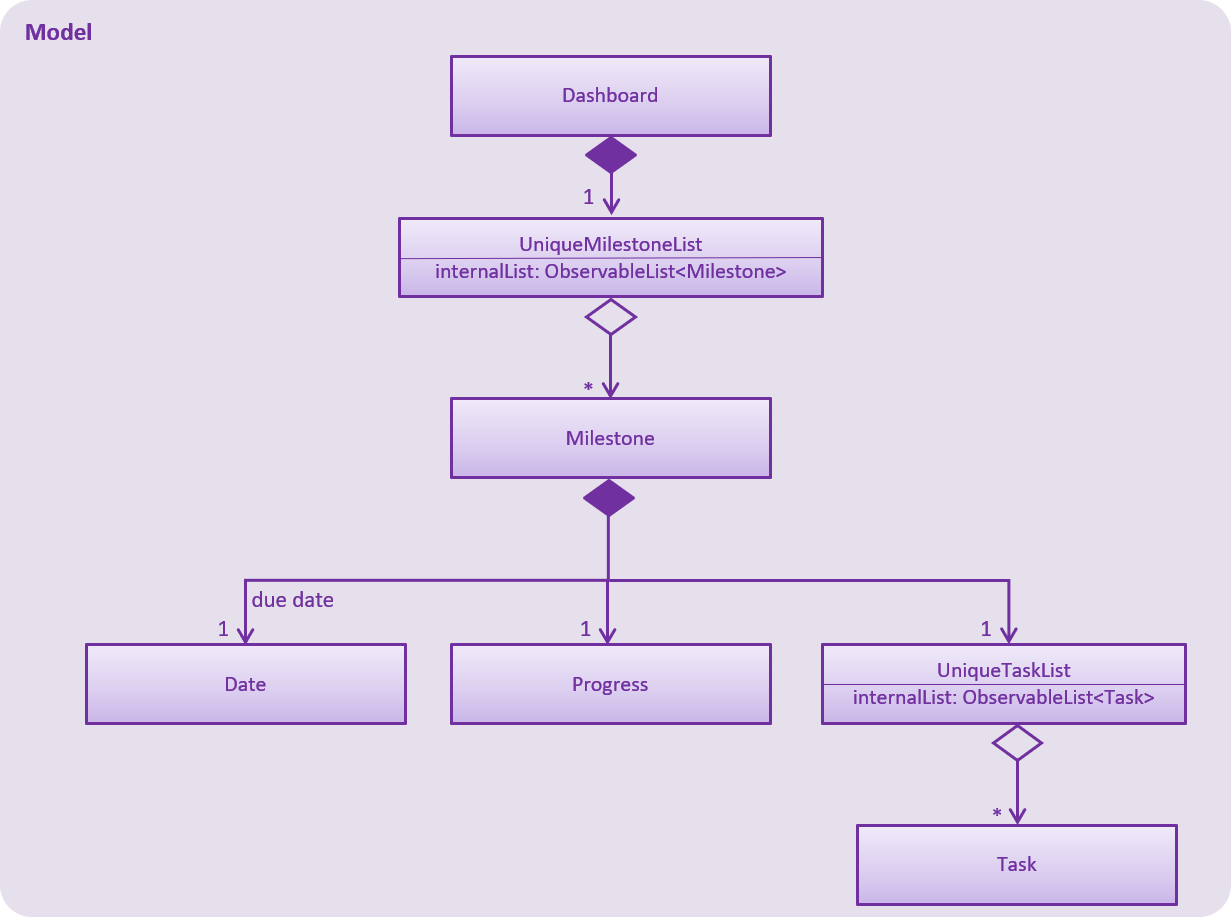
Both UniqueMilestoneList and UniqueTaskList contain an attribute called "internalList" which are ObservableList<Milestone> and ObservableList<Task> respectively.
This means that the UI can be bound to both of the lists so that it can automatically update when the data in any of the lists change.
A new Dashboard object is created every time a new Student is being created. The Dashboard object will contain an empty milestone list until the user adds new milestones to the dashboard.
This enforces 1-to-1 association between Student and Dashboard, as well as between Dashboard and UniqueMilestoneList.
For example, the constructor for Student is implemented this way:
    public Student(Name name, Phone phone, Email email, Address address, ProgrammingLanguage programmingLanguage, Set<Tag> tags) {
        requireAllNonNull(name, phone, email, address, tags);
        this.name = name;
        this.phone = phone;
        // ... initialise the rest of the attributes ...
        this.dashboard = new Dashboard();
    }
The constructor for Dashboard is implemented this way:
    public Dashboard() {
        milestoneList = new UniqueMilestoneList();
    }
Implementation for commands that modify the Dashboard
The AddMilestoneCommand, AddTaskCommand, CheckTaskCommand and ShowDashboardCommand commands facilitate operations to the dashboard.
A common implementation for commands that modify the dashboard (e.g. AddMilestoneCommand) is that a new copy of Dashboard is created with the new modification.
For example, in the AddMilestoneCommand, to add a new milestone object to the dashboard of a Student Object called "targetStudent":
-
AddMilestoneCommand.preprocessUndoableCommand()calls theAddMilestoneCommand.createEditedStudent()method which will create aStudentobject called "editedStudent". "editedStudent" is created with the same attributes of "targetStudent", but with a newDashboardobject containing the new milestone.
AddMilestoneCommand.createEditedStudent()is implemented as such:
    private void createEditedStudent() throws DuplicateMilestoneException {
        requireAllNonNull(studentToEdit, newMilestone);
        editedStudent = new StudentBuilder(targetStudent).withNewMilestone(newMilestone).build();
}-
In the
AddMilestoneCommand.executeUndoableCommand()method,Model.updateStudent(Student, Student)is called to replace "targetStudent" with "editedStudent" in the Address Book in-memory.
Implementation for displaying the dashboard
The ShowDashboardCommand facilitates the displaying of a student’s dashboard. The ShowDashboardCommand.execute() method is implemented this way:
    public CommandResult execute() throws CommandException {
        // ... check whether targetIndex is valid ...
        EventsCenter.getInstance().post(new ShowStudentDashboardEvent(lastShownList.get(targetIndex.getZeroBased())));
        // ... return command result ...
    }
As seen from the above code snippet, ShowDashboardCommand.execute() raises a ShowStudentDashboardEvent. The sequence diagram below shows how the EventsCenter reacts to that event.
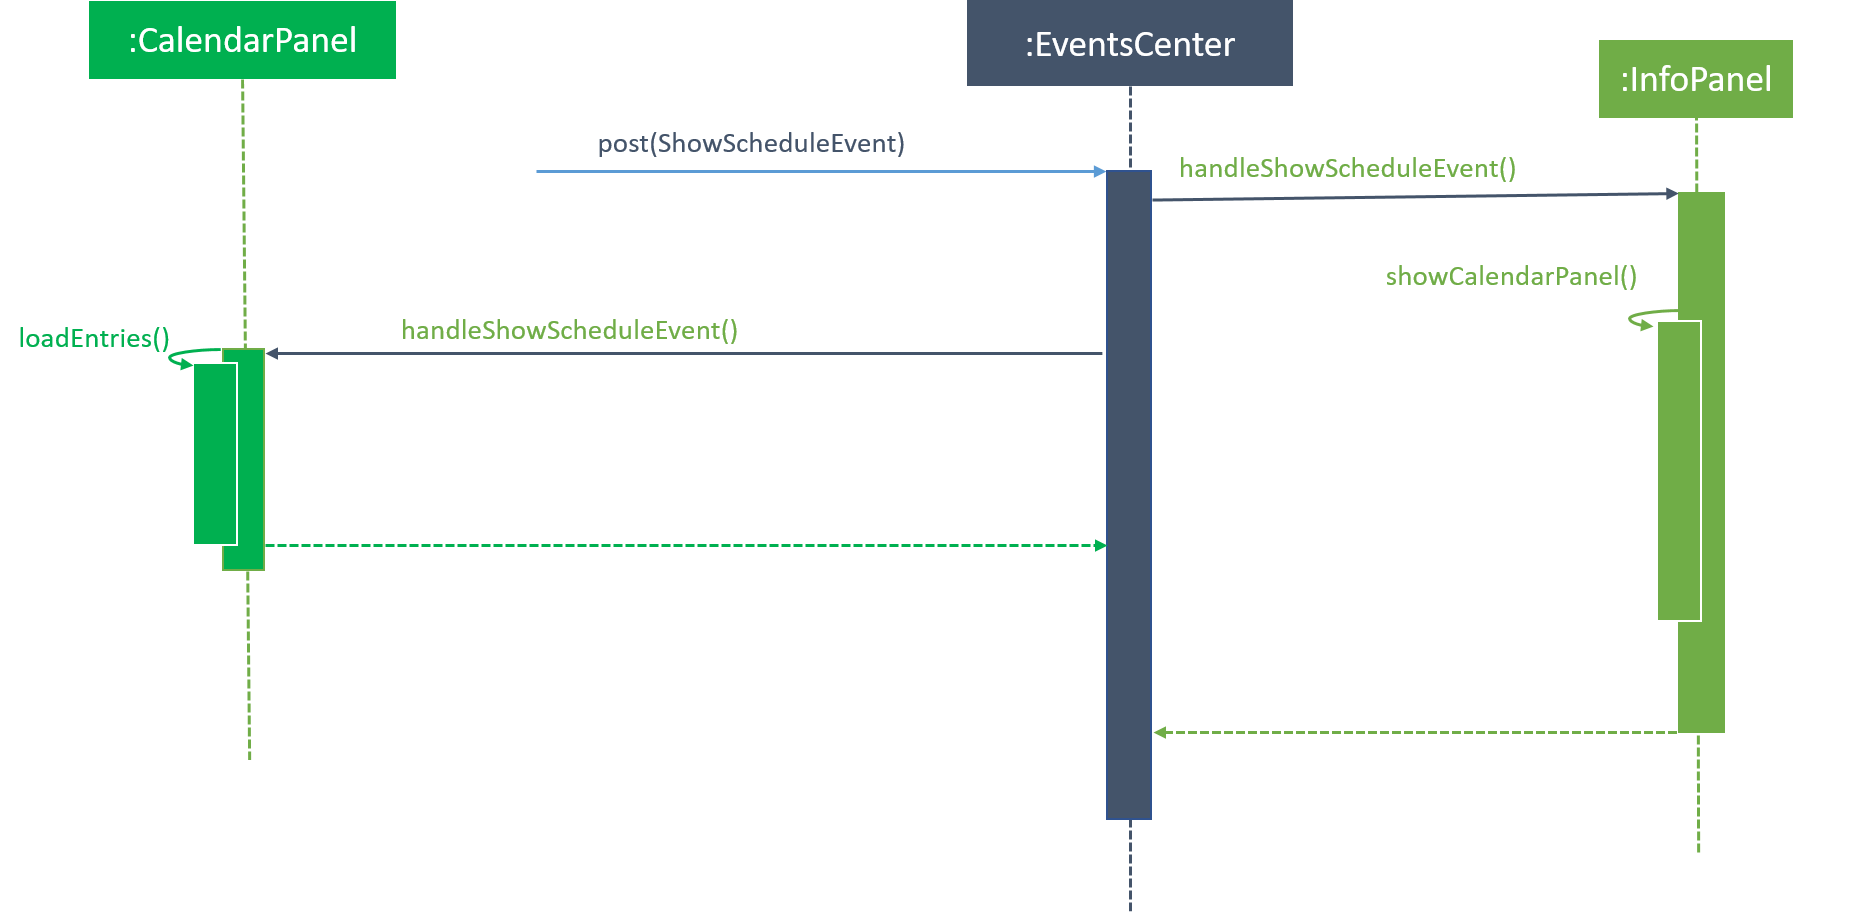
EventsCenter and the Ui components react to the ShowDashboardCommandAs seen from the above diagram,
-
InfoPanelhandles theShowStudentInDashboardevent. -
InfoPanelthen raises theShowStudentNameInDashboardwhich is handled byDashboardPanelto display the name of the student in the dashboard. -
Finally,
InfoPanelraises theShowMilestoneEventwhich is also handled byDashboardPanelto display the milestones of the student in the dashboard.
Design Considerations
| Aspect | Alternatives | Pros (+)/ Cons(-) |
|---|---|---|
Aspect: Data structure to support the dashboard feature |
Add a |
+ : Able to access the dashboard of a student easily. |
Add a new |
+ : Able to modify the dashboard easily if it is not made immutable. |